Disclaimer All information is offered in good faith and in the hope that it may be of use for educational purpose and for Database community purpose, but is not guaranteed to be correct, up to date or suitable for any particular purpose. db.geeksinsight.com accepts no liability in respect of this information or its use.
This site is independent of and does not represent Oracle Corporation in any way. Oracle does not officially sponsor, approve, or endorse this site or its content and if notify any such I am happy to remove.
Product and company names mentioned in this website may be the trademarks of their respective owners and published here for informational purpose only.
This is my personal blog. The views expressed on these pages are mine and learnt from other blogs and bloggers and to enhance and support the DBA community and this web blog does not represent the thoughts, intentions, plans or strategies of my current employer nor the Oracle and its affiliates or any other companies. And this website does not offer or take profit for providing these content and this is purely non-profit and for educational purpose only.
If you see any issues with Content and copy write issues, I am happy to remove if you notify me.
Contact Geek DBA Team, via geeksinsights@gmail.com
|
From 18c, we can have Shared Scan Listeners between clusters instead of having different scan listener for each cluster. This will save a lot of IP's and configuration aspect. For example, instead of 10 clusters deploying 3 SCAN VIPs per cluster using a total of 30 IP addresses, with shared SCAN deployments, you only deploy 3 SCAN VIPs for those same 10 clusters, requiring only 3 IP addresses.
Log in to the server cluster on which you want to configure the shared SCAN.
Create a SCAN listener that is exclusive to this shared SCAN cluster, as follows:
$ srvctl add scan_listener -clientcluster geekcluster
Create a new Oracle Notification Service (ONS) resource that is specific to the server cluster.
$ srvctl add ons -clientcluster geekcluster
The srvctl add ons command assigns an ID to the SCAN.
Export the SCAN listener to the client cluster, as follows:
$ srvctl export scan_listener -clientcluster cluster_name -clientdata geekscan
Export the ONS resource to the client cluster, as follows:
$ srvctl export ons -clientcluster cluster_name -clientdata geekscandata
For each SCAN listener, create and set the ORACLE_CONFIG_HOME environment variable. Include the ORA_CONFIG_HOME and TNS_ADMIN parameter settings in this environment variable.
export ORACLE_CONFIG_HOME=$ORACLE_HOME;$ORACLE_HOME/network/admin
Configure shared SCAN on each cluster that will use this service. a.Log in to the client cluster on which you want to configure the shared SCAN.
Add the SCAN to the client cluster, as follows:
$ srvctl add scan -clientdata file_name
Create a SCAN listener that is exclusive to this client cluster, as follows:
$ srvctl add scan_listener -clientdata file_name
Create an ONS resource for this cluster, as follows:
$ srvctl add ons -clientdata file_name
You may have a doubt that , if we use shared scan listeners between cluster how about the failure of VIP, infact all clusters must be in same subnet/nat configured and then even if one of scan ip is not available then other two scan ip's serve the purpose. Also the scan listeners purpose is to provide a single client access naming and direct the connection to respective database client not actually handles the network I/O of database client.
-Suresh
In this post, we will see few important ASM Disk group Level Enhancements in 18c.
DISK_REPAIR_TIME : Increased from 3.5 hrs to 12 Hrs
When a disk is taken offline from a disk group , the diskgroup will not immediately dropped as it waits for 3.5 Hrs as DISK_REPAIR_TIME , but now that is changed to 12 Hrs. Until then Oracle ASM fast resync keeps track of pending changes to extents on an offline disk during an outage. The extents are resynced when the disk is brought back online.
FLEX Disk Groups : Convert a normal diskgroup to flex diskgroup without diskgroup mount restricted.
In 12cR2, Oracle introduced Flex Disk group to have more granularity at Database level usage of storage, by segregating the storage into file groups etc. The disk group can be converted from normal to flex diskgroup and then add a filegroups with for each diskgroup. So to convert a normal diskgroup to a flex diskgroup the disk group must be in mount restricted mode.
In 18c, the mount restricted is not required for conversion you can convert the diskgroup from normal to flex diskgroup online.
Create a flex diskgroup
CREATE DISKGROUP flex_data FLEX REDUNDANCY DISK my_disk_discovery_path;
Diskgroup created.
Create a normal diskgroup
CREATE DISKGROUP normaltoflex NORMAL REDUNDANCY DISK '/devices/diskm*' ATTRIBUTE 'au_size'='4M', 'compatible.asm' = '18.0', 'compatible.rdbms' = '18.0','compatible.advm' = '18.0';
Diskgroup created.
Convert from Normal to Flex diskgroup
ALTER DISKGROUP normaltoflex CONVERT REDUNDANCY TO FLEX;
File Groups : Drop with cascade option
You can drop a file group including its associated files (drop including content) using the CASCADE keyword with the ALTER DISKGROUP ... DROP FILEGROUP SQL statement or the —r option with the ASMCMD rmfg command.
ALTER DISKGROUP DiskGroup_1 DROP FILEGROUP TEST CASCADE;
-Thanks
Suresh
In this post we cover two aspects of new features in 18c.
Readonly Oracle Home:
A read-only Oracle home separates the software from the database configuration information and log files. This separation enables you to easily share the software across different deployments. A read-only Oracle home also simplifies version control and standardization.
To enable the readonly oracle home, Run the roohctl Script
1.Go to the bin directory
$ cd /u01/app/oracle/product/18.0.0/dbhome_1/bin
2.Run the roohctl script to enable read-only Oracle home.
$ ./roohctl -enable
Password File Location:
Starting 18c, Oracle automatically searches the $ORACLE_BASE/dbs first for password files instead of $ORACLE_HOME/dbs, this facilitate the readonly Oracle Home feature to have the home in readonly but other files are out side of Home for read/write operations.
In the Oracle Cloud 18c, I tested for readonly oracle home, initially it failed with below error
[oracle@db18c-se-si bin]$ ./roohctl -enable
Enabling Read-Only Oracle home.
Cannot enable Read-Only Oracle home in a configured Oracle home.
The Oracle Home is configured with databases 'orcl'.
The Oracle Home is configured with listeners 'LISTENER'.
So I decided to comment out /etc/oratab and remove listener.ora file and give a go, and that worked.
[oracle@db18c-se-si bin]$ ./roohctl -enable
Enabling Read-Only Oracle home.
Update orabasetab file to enable Read-Only Oracle home.
Orabasetab file has been updated successfully.
Create bootstrap directories for Read-Only Oracle home.
Bootstrap directories have been created successfully.
Bootstrap files have been processed successfully.
Read-Only Oracle home has been enabled successfully.
Check the log file /u01/app/oracle/cfgtoollogs/roohctl/roohctl-180317AM065000.log.
[oracle@db18c-se-si bin]$
Disabled back
[oracle@db18c-se-si bin]$ ./roohctl -disable
Disabling Read-Only Oracle home.
Update orabasetab file to disable Read-Only Oracle home.
Orabasetab file has been updated successfully.
Read-Only Oracle home has been disabled successfully.
Check the log file /u01/app/oracle/cfgtoollogs/roohctl/roohctl-180317AM065204.log.
[oracle@db18c-se-si bin]$
In fact, this feature is available in 12c R2 as well, however it does not given the error that Database/Listener are configured
[oracle@db12c-se-si bin]$ ./roohctl -enable
Enabling Read-Only Oracle home.
Update orabasetab file to enable Read-Only Oracle home.
Orabasetab file has been updated successfully.
Create bootstrap directories for Read-Only Oracle home.
Bootstrap directories have been created successfully.
Read-Only Oracle home has been enabled successfully.
Check the log file /u01/app/oracle/cfgtoollogs/roohctl/roohctl-180317AM065422.log.
[oracle@db12c-se-si bin]$
What it mean is we cannot have the DB or Listeners configured with that home before we keep the Home in readonly.
-Thanks
Suresh
Hi
From 12cR2 and 18c, you can cancel the session instead of killing it which is long running and consuming time and resources.
The following is the syntax for cancelling a SQL statement:
ALTER SYSTEM CANCEL SQL 'SID, SERIAL, @INST_ID, SQL_ID';
If @INST_ID is not specified, the instance ID of the current session is used.
If SQL_ID is not specified, the currently running SQL statement in the specified session is terminated.
-Suresh
Hi,
We all aware of, when a table has attribute set with nologging option , those redo will be missed (although redo information there, the data will be missed) and standby will not apply those changes, and this will problematic when you do a switchover or failover unless you use force logging mode.
To address this in 18c, we have three different logging modes to ensure nologged blocks are also captured and send to standby depends on requirement of performance and availability perspective.
Of course, we can use FORCE LOGGING at primary database to ensure all modifications are captured, however this has an performance impact where in which you are doing a bulk load and this has to be captured in redo logs may slow down your load process.
To overcome this, we have two new Logging modes available at primary database,
ALTER DATABASE SET STANDBY NOLOGGING FOR DATA AVAILABILITY;
This mode causes the load operation to send the loaded data to each standby through its own connection to the standby. Means the data availability is critical so it has to delay the commit on primary side to ensure all non logged blocks also shipped and applied by MRP
ALTER DATABASE SET STANDBY NOLOGGING FOR LOAD PERFORMANCE;
This mode is similar to the above one except that the loading process can stop sending the data to the standbys if the network cannot keep up with the speed at which data is being loaded to the primary. Standby may miss the data but eventually it fetches the non logged blocks during recover process by MRP process.
Suresh
Starting 18c, we can create a clone of PDB using ASM level mirror copy the diskgroup with a point in time recovery of the PDB database.
This will be really helpful when you want to clone the PDB in the same instance and a point-in-time database clone is a full copy of a specific database, not the underlying storage system. Only data files are copied with in the ASM instance. Other files are created, or referenced as required to create the clone.
To use this feature, your compatible.asm and compatible.rdbms must be set 18.0 or higher and the disk groups must be flex/extended disk groups only and also the filegroups are part of only diskgroup.
It works in phases
- Prepare Mirror Copy - This process involves creating the cloned files and linking them with the parent files. However, the data is not copied at this time; the copying is done during remirroring. Remirroring occurs during the prepare phase of rebalance, which is initiated as part of this step
- Split the Mirror - Create the PDB using mirror copy
- Rebalance - Copying of ASM extents to Mirror
The progress of the operation and status can be checked in V$ASM_DBCLONE_INFO under DBCLONE_STATUS (PREPARED, SPLIT COMPLETED etc.)
Mirror Copy
ALTER SESSION SET CONTAINER = pdb1;
Session altered.

SHOW CON_NAME
CON_NAME
------------------------------
PDB1

ALTER PLUGGABLE DATABASE PREPARE MIRROR COPY pdb1_mirror;
Pluggable database altered.
Check in v$asm_dbclone_info view
SELECT * FROM V$ASM_DBCLONE_INFO;
GROUP_NUMBER DBCLONE_NAME  MIRRORCOPY_NAME  DBCLONE_STATUS   PARENT_DBNAME PARENT_FILEGROUP_NAME     CON_ID
------------ ------------- ---------------- ---------------- ------------- ---------------------- ---------
           1 DB_UNKNOWN    PDB1_MIRROR      PREPARED         ORCL_PDB1     ORCL_PDB1
Split the Mirror copy and create clone
SHOW CON_NAME
CON_NAME
------------------------------
CDB$ROOT

CREATE PLUGGABLE DATABASE newpdb1 FROM pdb1 USING MIRROR COPY pdb1_mirror;
Pluggable database created.

ALTER SESSION SET CONTAINER = newpdb1;
session altered.

SHOW CON_NAME
CON_NAME
------------------------------
NEWPDB1

Check the V$asm_dbclone_info to check the status of the SPLIT
SELECT * FROM V$ASM_DBCLONE_INFO;
GROUP_NUMBER DBCLONE_NAME  MIRRORCOPY_NAME  DBCLONE_STATUS   PARENT_DBNAME PARENT_FILEGROUP_NAME     CON_ID
------------ ------------- ---------------- ---------------- ------------- ---------------------- ---------
           1 ORCL_NEWPDB1  PDB1_MIRROR      SPLIT COMPLETED  ORCL_PDB1     ORCL_PDB1                      0
Drop the Mirror Copy
ALTER SESSION SET CONTAINER = pdb1;
Session altered.

ALTER PLUGGABLE DATABASE DROP MIRROR COPY pdb1_mirror;
Pluggable database altered.
Rebalance the Data group
ALTER DISKGROUP data REBALANCE WAIT;
Now the diskgroup data holds the datafiles for PDB1 and NEWPDB1 also. This is will really help not to touch anything on PDB level or copying datafiles for pdb clone level if you have datafiles under ASM.
-Thanks
Suresh
As we all aware , that we can have only one instance of Standby running with MRP (redo apply) running in RAC environments.
Starting 12.2.0.1, we can have multiple instances on standby side too with following command.
Generally, to start the MRP process we use,
ALTER DATABASE RECOVER MANAGED STANDBY DATABASE DISCONNECT FROM SESSION;
Now this has been enhanced in 12.2.0.1 to run MRP on all stand by instances.
ALTER DATABASE RECOVER MANAGED STANDBY DATABASE DISCONNECT FROM SESSION INSTANCES ALL;
Now this has been enhanced in 12.2.0.1 to run MRP on specific number of instances, Please note you cannot choose which instances to run.
ALTER DATABASE RECOVER MANAGED STANDBY DATABASE DISCONNECT FROM SESSION INSTANCES 2;
And you can check in v$recovery_progress view in each instances as MRP is running on them for redo sync
-Thanks
Suresh
In previous post, you have seen the PSM utility installation and using PSM utility, In this post you will learn how to use CLI to effectively manage the databases using commands.
#Create Database using Json file
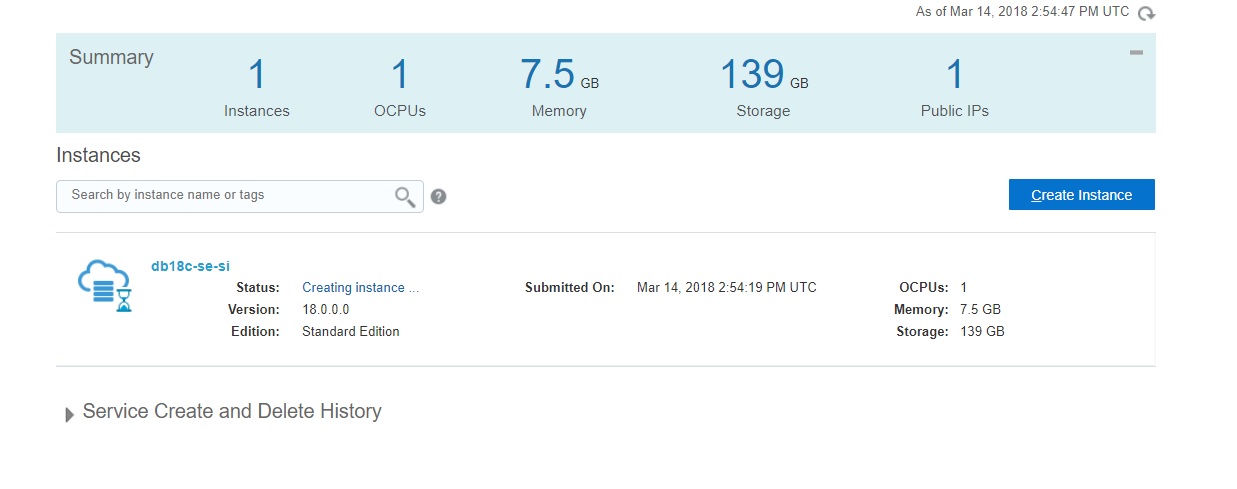
C:\Users\gandhi\Desktop>psm dbcs create-service -c 18cdatabase.json
Job ID : 1986734
# Check the Service aka database config
C:\Users\gandhi\Desktop>psm dbcs service -s db18c-se-si
Service: db18c-se-si
Status: In Progress
Version: 18.0.0.0
Edition: SE
Shape: oc3
Connect String: N/A
Backup Destination: NONE
Cloud Storage Container: N/A
PDB Name: pdb01
Created On: 2018-03-15T03:37:45.884+0000
# Check the Database Health
C:\Users\gandhi\Desktop>psm dbcs check-health -s db18c-se-si -of json
{
"summary":{
"status":"UP",
"status_time":"2018-03-15T03:56:47.220+00:00",
"status_message":"Running"
},
"identity_domain":"idcs-093b0defb99e433c9fb6aae82cfcb8d1",
"service_components":[
{
"component":"DB",
"vms":[
{
"vm":"db18c-se-si",
"servers":[]
}
],
"health_data":[
{
"unit":"%",
"name":"user_tablespace_usage",
"value":"2",
"type":"int",
"displayName":"Max Percentage for a User Tablespace Used"
}
]
}
],
"service_name":"db18c-se-si"
}
#Check the backups of Database,
C:\Users\gandhi\Desktop>psm dbcs view-backups -s db18c-se-si
Error: Internal Server Error. Backup / Recovery operations are not supported on this service instance.
# Stop Database , errored out with some job running, so looked at operation status as below with job id
C:\Users\gandhi\Desktop>psm dbcs stop -s db18c-se-si
Error:
{
"reason":"Resource Busy. Service idcs-093b0defb99e433c9fb6aae82cfcb8d1/db18c-se-si has active jobs. active job: 1986734 when attempting to process request: idcs-093b0defb99e433c9fb6aae82cfcb8d1/db18c-se-si: serviceType = dbaas, namespace = dbaas, operation = stop-dbaas-service"
}
# Check Operations that currently running with Job Number
C:\Users\gandhi\Desktop>psm dbcs operation-status -j 1986734
Service: db18c-se-si
Operation Type: CREATE_SERVICE
Status: RUNNING
Start Time: 2018-03-15T03:37:45.985+0000
End Time: N/A
C:\Users\gandhi\Desktop>psm dbcs operation-status -j 1989704
Service: db12c-se-si
Operation Type: CREATE_SERVICE
Status: RUNNING
Start Time: 2018-03-15T04:04:10.295+0000
End Time: N/A
# Check Infrastructure activities on the database host
C:\Users\gandhi\Desktop>psm dbcs activities -s db18c-se-si
Operation Type Status Start Time End Time
CREATE_SERVICE RUNNING 2018-03-15T03:37:45.985+0000 N/A
DELETE_SERVICE SUCCEED 2018-03-14T16:00:48.245+0000 2018-03-14T16:06:35.774+0000
CREATE_SERVICE SUCCEED 2018-03-14T14:54:19.049+0000 2018-03-14T15:24:37.529+0000
# Delete Database Instance and Service
C:\Users\gandhi\Desktop>psm dbcs delete-service -s db18c-se-si
Job ID: 1989723
# Check Any patches need for databases and available
C:\Users\gandhi\Desktop>psm dbcs available-patches -s db12c-se-si
Patch ID Severity Version Release Date Requires Restart?
26710464-SE Normal 12.2.0.1.171017 2017-10-17T01:40:00.000+0000 True
# Applying Patch, Errored out I need to check why
Ex: psm dbcs patch -s ExampleInstance -p es-20831110-EE -g NODE-SAFE -h REQUIRE_STATUS_HA -t 100 -n Applying JDK80 patch
C:\Users\gandhi\Desktop>psm dbcs patch -s db12c-se-si -p 26710464-SE -of json
Error: Unsupported Media Type
# Pre check Patch
C:\Users\gandhi\Desktop>psm dbcs precheck-patch -s db12c-se-si -p 26710464-SE
Error: Unsupported Media Type
# Take snapshot of Database
C:\Users\gandhi\Desktop>psm dbcs create-snapshot -s db12c-se-si -n snapshottestest12c
Job ID : 1987024
# Scale up your database host capacity
C:\Users\gandhi\Desktop> psm dbcs scale-up -s db12c-ee -p oc4 -a 10
Specifies scaling up the shape of the service instance.
Valid values for shape-name are as follows:
•oc4 — 2 OCPUs with 15 GB RAM
•oc5 — 4 OCPUs with 30 GB RAM
•oc6 — 8 OCPUs with 60 GB RAM
•oc7 — 16 OCPUs with 120 GB RAM
•oc1m — 1 OCPU with 15 GB RAM
•oc2m — 2 OCPUs with 30 GB RAM
•oc3m — 4 OCPUs with 60 GB RAM
•oc4m — 8 OCPUs with 120 GB RAM
•oc5m — 16 OCPUs with 240 GB RAM
# Scale down your database host capacity
C:\Users\gandhi\Desktop> psm dbcs scale-down -s db12c-ee -p oc4 -a oc5-a 10
-Thanks
Suresh
Hello All
In this post, we see how to install the PSM (Paas Service Manager) CLI utility to manage the cloud operations for Oracle. It has vide range of commands to manage different resources and can be useful to automate the Oracle Cloud Infrastructure operations.
The following will be covered in this post.
- Install Python 3.3 or later and curl
- Install PSM Utility (via Cloud console or using CURL)
- Setup PSM
- Execute first job & check the status
- Look at templates
Install Python 3.3 o later and curl
Download Python Installer from Install Python 3.3 or later from https://www.python.org/downloads/
Download Curl executable from https://curl.haxx.se/download.html (check for SSL enabled and download)
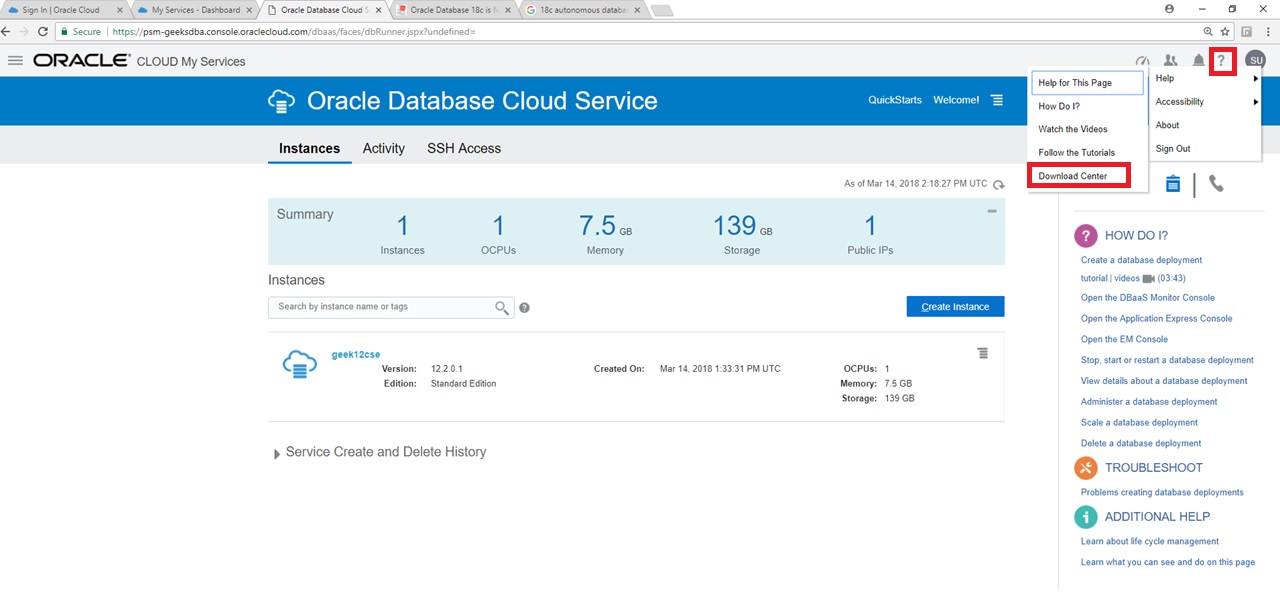
Download PSM Utility via Cloud Console
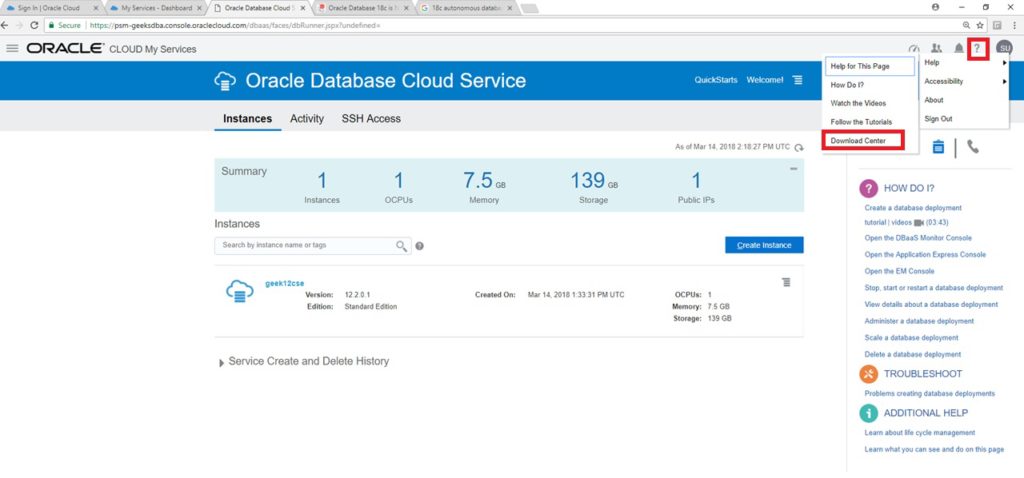
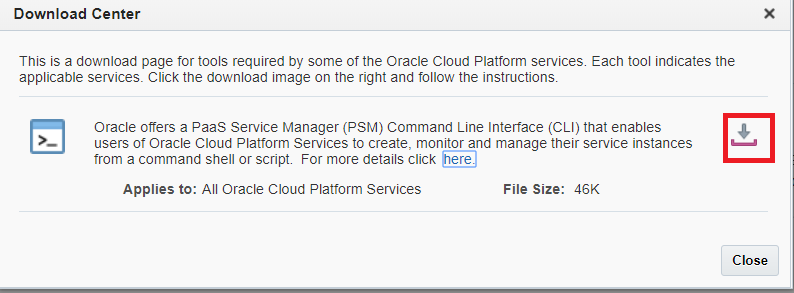
Log into your Oracle Cloud Account --> MyServices --> Help Icon > Download Centre --> Click on Download link to download the PSM utility
Download PSM Utility via CURL
curl -X GET -u myuser321:mypassword321 -H X-ID-TENANT-NAME:MyIdentityDomain54321 https://psm.us.oraclecloud.com/paas/core/api/v1.1/cli/MyIdentityDomain54321/client -o psmcli.zip
Install PSMUtility with pip3

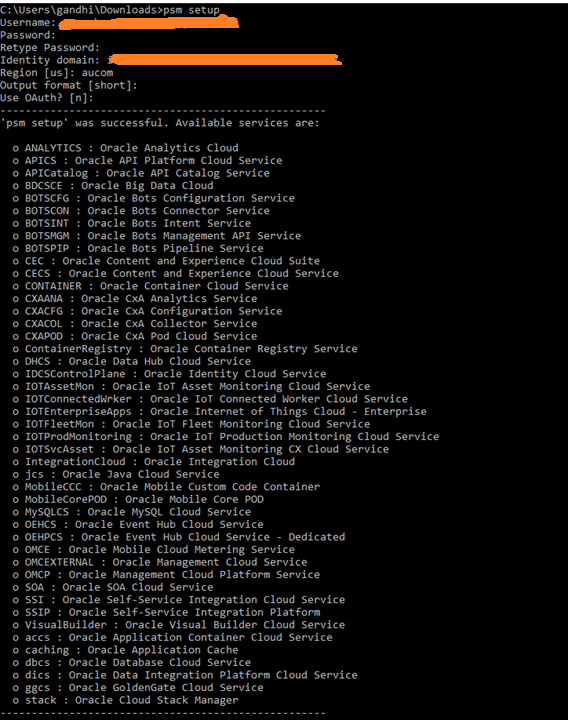
Setup PSM Utility
Create Sample Template for 18c Database and save as 18cdatabase.json
{
"description": "18c instance",
"edition": "SE",
"level": "PAAS",
"serviceName": "db18c-se-si",
"shape": "oc3",
"subscriptionType": "HOURLY",
"version": "18.0.0.0",
"vmPublicKeyText": "ssh-rsa AzYcAqN ....",
"parameters": [
{
"type": "db",
"usableStorage": "15",
"adminPassword": "Welcome_1",
"sid": "orcl",
"pdbName": "pdb01",
"failoverDatabase": "no",
"backupDestination": "NONE"
}
]
}
Run the PSM Utility to create service / instance or 18c Database

Check in cloud console for the status of the database creation

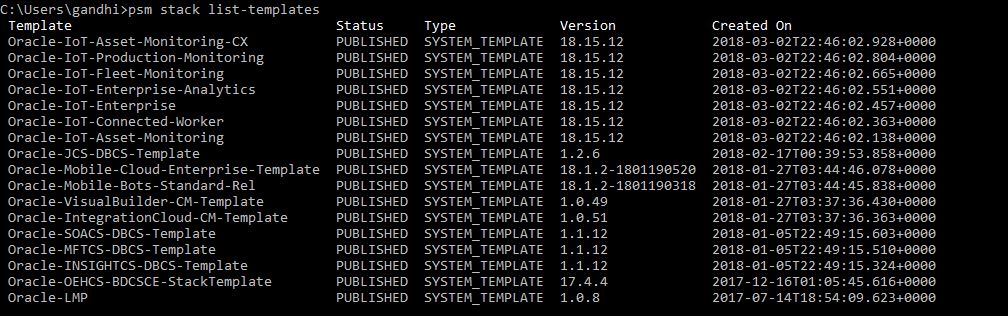
Using PSM Utility ex: list templates for Stacks
Next Post - Using PSM Utility to Manage Database Operations
In 12c, we can have refreshable PDB from one PDB to another PDB via database link.
--Manual Refresh
CREATE PLUGGABLE DATABASE pdb_ref FROM pdb1@pdb_link REFRESH MODE MANUAL;
-- Automatically refresh ever 60 minutes.
CREATE PLUGGABLE DATABASE pdb_ref FROM pdb1@pdb_link REFRESH MODE EVERY 60 MINUTES;
In 18c, this is extended and we can switchover the primary and clone DB act as source and vice versa using
ALTER SESSION SET CONTAINER = pdb_ref;
ALTER PLUGGABLE DATABASE REFRESH MODE MANUAL FROM pdb1@pdb_link SWITCHOVER;
Now with above alter statement, pdb_ref will be marked as source and pdb1 will be marked as clone.
Now, you must open the PDB1 (source) as readonly and set refresh mode manual or set interval.
ALTER SESSION SET CONTAINER = pdb1
ALTER PLUGGABLE DATABASE OPEN READ ONLY;
ALTER PLUGGABLE DATABASE REFRESH MODE EVERY 10 MINUTES;
Then, you can log to the reference PDB which is actually a clone but currently the source PDB and do any DML which will eventually populates to PDB1
-Thanks
Suresh
|
Follow Me!!!