Disclaimer All information is offered in good faith and in the hope that it may be of use for educational purpose and for Database community purpose, but is not guaranteed to be correct, up to date or suitable for any particular purpose. db.geeksinsight.com accepts no liability in respect of this information or its use.
This site is independent of and does not represent Oracle Corporation in any way. Oracle does not officially sponsor, approve, or endorse this site or its content and if notify any such I am happy to remove.
Product and company names mentioned in this website may be the trademarks of their respective owners and published here for informational purpose only.
This is my personal blog. The views expressed on these pages are mine and learnt from other blogs and bloggers and to enhance and support the DBA community and this web blog does not represent the thoughts, intentions, plans or strategies of my current employer nor the Oracle and its affiliates or any other companies. And this website does not offer or take profit for providing these content and this is purely non-profit and for educational purpose only.
If you see any issues with Content and copy write issues, I am happy to remove if you notify me.
Contact Geek DBA Team, via geeksinsights@gmail.com
|
My friend is having a problem while import using IMPDP, which poses us some questions here.
The impdp is hung or just processing at constraints enabling around 7000+ (massive 2TB database) and apparently ran for 3 days.
Note, He had already used parallel = 10.
Now question is,
1) Does parallel clause work to create indexes in parallel to expedite the impdp processes?
2) Does parallel clause work to create/enable constraints in parallel to speed up the impdp?
How we all can help him in this case? What are all the solutions we have?
Every suggestion is valuable and may throw or shed some light into new theory.
Looking ahead for your knowledge here.
I will list all possibilities or solutions (of course my friend has already one) later once I got some inputs from you all.
-Thanks
Geek DBA
Hello,
Until 10g when you want to export and import between releases (i.e 10g to 11g), For example you want to export from 11g database and import it into 10g.
This is not possible until 10g, unless you use the higher version binaries(means expdp/impdp executables) in both databases.
But from 11g R1 onwards you have an option to do so using VERSION option.
Thanks to my colleague again (Satish) who asked me this and I have to search for it as I remembered sometime back of this option, hope this will be useful to you all as well.
You can import your 11g expdp dump file into Oracle 10g if you make sure you use "VERSION=10.2" parameter during export.
Here is the example of using the expdp version parameter to make a dump file acceptable to an earlier release of Oracle:
1) Export using the expdp version parameter:
expdp hr/hr TABLES=hr.employees2 VERSION=10.2 DIRECTORY=data_pump_dir DUMPFILE=emp2.dmp LOGFILE=emp2.log
Export: Release 11.2.0.1.0 - Production on Thu Jan 3 20:10:51 2010
Copyright (c) 1982, 2009, Oracle and/or its affiliates.  All rights reserved.
Connected to: Oracle Database 11g Enterprise Edition Release 11.2.0.1.0 - Production
With the Partitioning, OLAP, Data Mining and Real Application Testing options
Starting "HR"."SYS_EXPORT_TABLE_01":  hr/******** TABLES=hr.employees2 VERSION=10.2
          DIRECTORY=data_pump_dir DUMPFILE=emp2.dmp LOGFILE=emp2.log
Estimate in progress using BLOCKS method...
Processing object type TABLE_EXPORT/TABLE/TABLE_DATA
Total estimation using BLOCKS method: 64 KB
Processing object type TABLE_EXPORT/TABLE/TABLE
. . exported "HR"."EMPLOYEES2"                           16.12 KB     107 rows
Master table "HR"."SYS_EXPORT_TABLE_01" successfully loaded/unloaded
******************************************************************************
Dump file set for HR.SYS_EXPORT_TABLE_01 is:/u01/app/oradata/ORCL/exports/emp2.dmp
Job "HR"."SYS_EXPORT_TABLE_01" successfully completed at 20:11:01
Import into earlier release of Oracle:-
1) Copy the dump file into 10g data_pump_directory and grant permissions to HR

DIRECTORY_NAME                 DIRECTORY_PATH
------------------------------ ----------------------------------------
    DATA_PUMP_DIR                  /u01/app/oradata/10g2/exports
2) SQL> grant read, write on directory data_pump_dir to hr;
Grant succeeded.

SQL> exit
Import the dump file using 10g binaries, observe the version of the Release is 10.2.0.1
3) impdp hr/hr TABLES=hr.employees2 DIRECTORY=data_pump_dir DUMPFILE=emp2.dmp
Import: Release 10.2.0.1.0 - Production on Thursday, January, 2013 20:15:53
Copyright (c) 2003, 2005, Oracle.  All rights reserved.
Connected to: Oracle Database 10g Express Edition Release 10.2.0.1.0 - Production
Master table "HR"."SYS_IMPORT_TABLE_01" successfully loaded/unloaded
Starting "HR"."SYS_IMPORT_TABLE_01":  hr/******** TABLES=hr.employees2 DIRECTORY=data_pump_dir
   DUMPFILE=emp2.dmp LOGFILE=emp2_imp.log
Processing object type TABLE_EXPORT/TABLE/TABLE
Processing object type TABLE_EXPORT/TABLE/TABLE_DATA
. . imported "HR"."EMPLOYEES2"                           16.12 KB     107 rows
Job "HR"."SYS_IMPORT_TABLE_01" successfully completed at 20:17:05
4) Check the data
sqlplus hr/hr
SQL*Plus: Release 10.2.0.1.0 - Production on Thursday Jan 03 20:20:37 2013
Copyright (c) 1982, 2005, Oracle.  All rights reserved.
Connected to:
Oracle Database 10g Express Edition Release 10.2.0.1.0 - Production
SQL> select count(*) from employees2;
  COUNT(*)
----------
       107
Nice and cool feature rather struggling with different versions of oracle to achieve the same.
Hope this helps
-Thanks
Geek DBA
Object statistics will become stale whenever there is an dml operations performed on those objects, that means new/deletion of rows, adding columns, updating columns may change the row count, number of blocks, index entries etc. This staleness of object statistics has been determined or hardcoded to 10% of the modifications to the objects(tables etc), for which the same will be tracked in dba_tab_modifications (base table mon_mod$) and visible in dba_tab_statistics column stale_stats.
Just some basics of dba_tab_modifications,
Until 9i, one has to put the object in monitoring and the dml changes to the object will be captured
	ALTER TABLE table MONITORING;
	ALTER TABLE table NOMONITORING;
From Oracle 10.1 and above table modification statistics:
	are enabled if STATISTICS_LEVEL is TYPICAL or ALL
	are disabled if STATISTICS_LEVEL is BASIC
	are collected in the SGA
	are automatically flushed to SYS.MON_MODS$
	       by SMON background process
	       every 15 minutes to SYS.MON_MODS$
	if a significant number of rows has changed (possibly 10%)
	can be manually flushed to SYS.MON_MOD$ using:
	       DBMS_STATS.FLUSH_DATABASE_MONITORING_INFO
	are reported in DBA_TAB_MODIFICATIONS
	modification in dba_tab_statistics, mark stale_stats column "yes"
Back to post now,
Oracle automatically determines which object need statistics which does not by crosschecking the stale_stats for those objects. If objects stats were stale i.e more than 10% it will collect the stats and does not collect for rest.
DBMS_STATS.gather_database_procedure arguments:-
DBMS_STATS.GATHER_DATABASE_STATS (
   estimate_percent NUMBER   DEFAULT to_estimate_percent_type
                                                (get_param('ESTIMATE_PERCENT')),
   block_sample     BOOLEAN  DEFAULT FALSE,
   method_opt       VARCHAR2 DEFAULT get_param('METHOD_OPT'),
   degree           NUMBER   DEFAULT to_degree_type(get_param('DEGREE')),
   granularity      VARCHAR2 DEFAULT GET_PARAM('GRANULARITY'),
   cascade          BOOLEAN  DEFAULT to_cascade_type(get_param('CASCADE')),
   stattab          VARCHAR2 DEFAULT NULL,
   statid           VARCHAR2 DEFAULT NULL,
   options          VARCHAR2 DEFAULT 'GATHER',
   objlist          OUT      ObjectTab,
   statown          VARCHAR2 DEFAULT NULL,
   gather_sys       BOOLEAN  DEFAULT TRUE,
   no_invalidate    BOOLEAN  DEFAULT to_no_invalidate_type (
                                     get_param('NO_INVALIDATE')),
   obj_filter_list ObjectTab DEFAULT NULL);
Further read, Just for your understanding, dbms_stats.gather_***_stats(options parameter)
GATHER - gather statistics for all objects
GATHER AUTO - gather statistics for all objects needing new statistics
GATHER STALE - gather statistics for all objects having stale statistics
GATHER EMPTY- gather statistics for all objects having no statistics
LIST AUTO - list objects needing new statistics
LIST STALE - list objects having stale statistics
LIST EMPTY - list objects having stale statistics
So, it is not good for some objects as even the <10% changes / staleness may be very large for very large tables and optimizer may choose inefficient plans. To fix this we have to manually collect the stats as Oracle skips those objects while automatic stats job runs until 10g.
In 11g, If you are into such situation where you want to change the staleness threshold for particular object, we have an option to modify or determine the stale percent of the statistics for database/schema/object level.
From the documentation,
The automatic statistics-gathering job uses the DBMS_STATS.GATHER_DATABASE_STATS_JOB_PROC procedure, which uses the same default parameter values as the other DBMS_STATS.GATHER_*_STATS procedures. The defaults are sufficient in most cases. However, it is occasionally necessary to change the default value of one of the statistics gathering parameters, which can be accomplished by using the DBMS_STATS.SET_*_PREF procedures. Parameter values should be changed at the smallest scope possible, ideally on a per-object bases. For example, if you want to change the staleness threshold for a specific table, so its statistics are considered stale when only 5% of the rows in the table have changed rather than the default 10%, you can change the STALE_PERCENT table preference for that one table using the DBMS_STATS.SET _TABLE_PREFS procedure. By changing the default value at the smallest scope you limit the amount of non-default parameter values that need to be manually managed.
Changing stale percent:-
SQL> DBMS_STAT.set_table_prefs('SH','SALES','STALE_PERCENT',5);
STALE_PERCENT - This value determines the percentage of rows in a table that have to change before the statistics on that table are deemed stale and should be regathered. The default value is 10%.
Which
changes the stale_percent to 5
for this table and when stats job runs it will not look for 10% rather it looks for 5% staleness and collect the stats for this table.
You can also set the stale_percent at database level and schema level using dbms_stats.set_database_prefs & dbms_stats.set_schema_prefs subprograms.
Hope this helps.
-Thanks
Geek DBA
Hi,
Well, If your database environment has well established statistics gathering mechanism or your application has specific requirement of statistics gathering, you may need to disable the automatic statistics gathering, this is a bit different in 10g and 11g.
All of us aware starting 10g automatic statistics gather job will kicked off every night 10PM and runs for an 8 hours and then stopped.
Further, starting from 11g along with automatic statistics gathering few additional jobs also run as follows,
Oracle 11g includes three automated database maintenance tasks:
Automatic Optimizer Statistics Collection - Gathers stale or missing statistics for all schema objects (more info). The task name is 'auto optimizer stats collection'.
Automatic Segment Advisor - Identifies segments that could be reorganized to save space (more info). The task name is 'auto space advisor'.
Automatic SQL Tuning Advisor - Identifies and attempts to tune high load SQL (more info). The task name is 'sql tuning advisor'.
But if you want to disable the same, in 10g and 11g here are the ways.
SQL> exec dbms_scheduler.disable('SYS.GATHER_STATS_JOB');
or
SQL> exec dbms_stats.set_param('AUTOSTATS_TARGET', 'ORACLE');
Find more documentation here.
http://docs.oracle.com/cd/B19306_01/appdev.102/b14258/d_stats.htm#i1048566
Note:- the dbms_stats.set_param has been deprecated and dbms_stats.set_***_prefs has been introduced in 11g.
note if you keep AUTO instead of Oracle you are enabling the stats.
SQL> exec dbms_stats.set_global_prefs('AUTOSTATS_TARGET','ORACLE');
or
Note:- this will disable all three maintainance tasks for all windows
(since 11g the maintainance scheduled tasks has been differentiated as windows)
SQL> EXEC DBMS_AUTO_TASK_ADMIN.disable;
or
Note:- (the window_name and client name can be found in DBA_AUTOTASK_WINDOW_CLIENTS, here we are disabling only monday window)
SQL>  begin
    DBMS_AUTO_TASK_ADMIN.disable(
    client_name => 'auto optimizer stats collection',
    operation   => NULL,
    window_name => 'MONDAY_WINDOW');

SQL>  DBMS_AUTO_TASK_ADMIN.disable(
    client_name => 'auto space advisor',
    operation   => NULL,
    window_name => 'MONDAY_WINDOW');

SQL>  DBMS_AUTO_TASK_ADMIN.disable(
    client_name => 'sql tuning advisor',
    operation => NULL,
    window_name => 'MONDAY_WINDOW');
END;
/
SYS on 07-AUG-12 at orcl >select * from DBA_AUTOTASK_WINDOW_CLIENTS where WINDOW_NAME = 'MONDAY_WINDOW';
WINDOW_NAME                    WINDOW_NEXT_TIME                                                         WINDO AUTOTASK OPTIMIZE SEGMENT_ SQL_TUNE HEALTH_M
------------------------------ --------------------------------------------------------------------------- ----- -------- -------- -------- -------- --------
MONDAY_WINDOW                  08-AUG-12 10.00.00.000000 PM ASIA/CALCUTTA                               FALSE ENABLED  ENABLED  ENABLED  ENABLED  DISABLED
1 rows selected.
SYS on 07-AUG-12 at orcl >BEGIN
2    DBMS_AUTO_TASK_ADMIN.disable(
3      client_name => 'auto optimizer stats collection',
4      operation   => NULL,
5      window_name => 'MONDAY_WINDOW');
6  END;
7  /
PL/SQL procedure successfully completed.
SYS on 07-AUG-12 at orcl >select * from DBA_AUTOTASK_WINDOW_CLIENTS where WINDOW_NAME = 'MONDAY_WINDOW';
WINDOW_NAME                    WINDOW_NEXT_TIME                                                         WINDO AUTOTASK OPTIMIZE SEGMENT_ SQL_TUNE HEALTH_M
------------------------------ --------------------------------------------------------------------------- ----- -------- -------- -------- -------- --------
MONDAY_WINDOW                  08-AUG-12 10.00.00.000000 PM ASIA/CALCUTTA                               FALSE ENABLED  DISABLED ENABLED  ENABLED  DISABLED
1 rows selected.
SYS on 07-AUG-12 at orcl >
Find More:- http://docs.oracle.com/cd/E11882_01/server.112/e16638/stats.htm#i41448
Hope this helps
-Thanks
Geek DBA
Hello,
Sometimes we tend to miss some simple thing which I had similar in expdp and impdp.
Normally when you want to export a schema and import into another schema we user fromuser and touser, before to that you have to create the user in target database where you are going to import.
In expdp/impdp also you have remap_schema for the same purpose, but you dont need to create the target schema there.
IMPDP itself creates target schema for you but the schema will be locked and you have to set the password before you start using it.
Let’s say that I want to import into HR_NEW schema instead of HR.
We just add a remap_schema into the import command: remap_schema=HR:HR_NEW
This will actually even create the new user (schema)!
Thanks to my colleague (Swapna) pointing out to me that it is possible, infact the following is her work really.
C:Temp>impdp system/oracle dumpfile=hr.dmp directory=dmpdir schemas=hr logfile=hr_imp.log remap_schema=HR:HR_NEW
Import: Release 11.2.0.2.0 - Jan 03 11:42:28 2013
Copyright (c) 1982, 2009, Oracle and/or its affiliates. All rights reserved.
Connected to: Oracle Database 11g Express Edition Release 11.2.0.2.0
Master table "SYSTEM"."SYS_IMPORT_SCHEMA_01? successfully loaded/unloaded
Starting "SYSTEM"."SYS_IMPORT_SCHEMA_01?: system/******** dumpfile=hr.dmp
directory=dmpdir schemas=hr logfile=hr_imp.log remap_schema=HR:HR_NEW
Processing object type SCHEMA_EXPORT/USER
Processing object type SCHEMA_EXPORT/SYSTEM_GRANT
Processing object type SCHEMA_EXPORT/ROLE_GRANT
Processing object type SCHEMA_EXPORT/DEFAULT_ROLE
Processing object type SCHEMA_EXPORT/TABLESPACE_QUOTA
Processing object type SCHEMA_EXPORT/PRE_SCHEMA/PROCACT_SCHEMA
Processing object type SCHEMA_EXPORT/SEQUENCE/SEQUENCE
Processing object type SCHEMA_EXPORT/TABLE/TABLE
Processing object type SCHEMA_EXPORT/TABLE/TABLE_DATA
. . imported "HR_NEW"."COUNTRIES" 6.367 KB 25 rows
. . imported "HR_NEW"."DEPARTMENTS" 7.007 KB 27 rows
. . imported "HR_NEW"."EMPLOYEES" 16.80 KB 107 rows
. . imported "HR_NEW"."JOB_HISTORY" 7.054 KB 10 rows
. . imported "HR_NEW"."JOBS" 6.992 KB 19 rows
. . imported "HR_NEW"."LOCATIONS" 8.273 KB 23 rows
. . imported "HR_NEW"."REGIONS" 5.476 KB 4 rows
Processing object type SCHEMA_EXPORT/TABLE/INDEX/INDEX
Processing object type SCHEMA_EXPORT/TABLE/CONSTRAINT/CONSTRAINT
Processing object type SCHEMA_EXPORT/TABLE/INDEX/STATISTICS/INDEX_STATISTICS
Processing object type SCHEMA_EXPORT/TABLE/COMMENT
Processing object type SCHEMA_EXPORT/PROCEDURE/PROCEDURE
Processing object type SCHEMA_EXPORT/PROCEDURE/ALTER_PROCEDURE
Processing object type SCHEMA_EXPORT/VIEW/VIEW
Processing object type SCHEMA_EXPORT/TABLE/CONSTRAINT/REF_CONSTRAINT
Processing object type SCHEMA_EXPORT/TABLE/TRIGGER
Processing object type SCHEMA_EXPORT/TABLE/STATISTICS/TABLE_STATISTICS
Job "SYSTEM"."SYS_IMPORT_SCHEMA_01? successfully completed at 11:42:47
The new user is locked as said.
SQL> connect hr_new/hr_new
ERROR:
ORA-28000: the account is locked

Unlock:

C:Temp>sqlplus system/oracle
SQL*Plus: Release 11.2.0.2.0 Jan 03 11:42:28 2013 11:44:30 2013
Copyright (c) 1982, 2010, Oracle. All rights reserved.
Connected to:
Oracle Database 11g Express Edition Release 11.2.0.2.0
SQL> alter user hr_new account unlock;
User altered.
SQL> alter user hr_new identified by hr_new;
User altered.
SQL> connect hr_new/hr_new
Connected.
Same case with remap_tablespaces with remap_tablespace.
-Thanks
Geek DBA
OMS (Enterprise Manager) is generating huge quatity of logs. Logs generated by the Grid Infrastructure are spread across modules.
There are logs for http Apache module, log for Infrastructure, agents logs and traces, opmn logs etc.
Here are the location of logs that use a lot of disk space:
1) Agent Log and Trace Files:
[oracle@myserver midw]$ cd $ORACLE_MIDW_HOME/agent/core/12.1.0.1.0/bin/
[oracle@myserver bin]$ ./emctl getemhome
Oracle Enterprise Manager 12c Cloud Control 12.1.0.1.0
Copyright (c) 1996, 2011 Oracle Corporation. All rights reserved.
EMHOME=/u01/products/midw/agent/agent_inst
2) log and trace files will be located at /sysman/log
[oracle@myserver bin]$ cd /u01/oracle/midw/agent/agent_inst/sysman/log/
3) For Oracle Management Service Log and Trace Files:
/em//sysman/log/
[oracle@myserver log]$ cd /u01/oracle/midw/gc_inst/em/EMGC_OMS1/sysman/log/
[oracle@myserver log]$ pwd
/u01/oracle/midw/gc_inst/em/EMGC_OMS1/sysman/log
4) Oracle HTTP Server (OHS) -//diagnostics/logs/OHS/
/u01/oracle/midw/gc_inst/WebTierIH1/diagnostics/logs/OHS/ohs1
5) OPMN//diagnostics/logs/OPMN/
/u01/oracle/midw/gc_inst/WebTierIH1/diagnostics/logs/OPMN/opmn
6) Oracle WebLogic -/user_projects/domains//servers//logs/.log
/u01/oracle/midw/gc_inst/user_projects/domains/GCDomain/servers/EMGC_OMS1/logs/EMGC_OMS1.log
Oracle maintain rotates all above logs using log sizes etc in respective configurations but it wont delete the old files. We have to manually cleanup those.
Log rotations see here:- http://docs.oracle.com/cd/E11857_01/em.111/e16790/logging.htm
Reference Oracle Support (metalink) note:1271676.1
Script for cleaning Enterprise Manager 11g - Grid Control
#!/bin/sh

#find logs older then 15 days and remove them from disk
find /u01/oracle/gc_inst/user_projects/domains/GCDomain/servers/EMGC_OMS1/logs/ -name "access.log*" -mtime +15 -print|xargs rm
find /home/oracle/oradiag_oracle/diag/clients/user_oracle/host_1387324873_11/alert  -name "log_*.xml" -mtime +15 -print|xargs rm
find /u01/oracle/gc_inst/user_projects/domains/GCDomain/servers/EMGC_OMS1/logs/ -name "EMGC_OMS1.log*" -mtime +15 -print|xargs rm
find /u01/oracle/gc_inst/user_projects/domains/GCDomain/servers/EMGC_OMS1/logs/ -name "EMGC_OMS1.out*" -mtime +15 -print|xargs rm
find /u01/oracle/gc_inst/user_projects/domains/GCDomain/servers/EMGC_OMS1/logs/ -name "EMGC_OMS1-diagnostic*.log" -mtime +15 -print|xargs rm
find /u01/oracle/gc_inst/WebTierIH1/diagnostics/logs/OHS/ohs1/  -name "access_log*" -mtime +15 -print|xargs rm
find /u01/oracle/gc_inst/WebTierIH1/diagnostics/logs/OHS/ohs1/  -name "em_upload_https_access_log*" -mtime +15 -print|xargs rm
find /u01/oracle/gc_inst/WebTierIH1/diagnostics/logs/OHS/ohs1/  -name "ohs1-*.log" -mtime +15 -print|xargs rm

#manually rotate the logs. other way is to follow metalink note:1271676.1
#how to automaticaly rotate logs in Enterprise Manager 11g

export DATE_VAR=`date '+%d%m%Y'`
#create a copy of the log with the stampdate appended to filename
cat /u01/oracle/gc_inst/WebTierIH1/diagnostics/logs/OHS/ohs1/mod_wl_ohs.log>/u01/oracle/gc_inst/WebTierIH1/diagnostics/logs/OHS/ohs1/mod_wl_ohs_$DATE_VAR.log
>/u01/oracle/gc_inst/WebTierIH1/diagnostics/logs/OHS/ohs1/mod_wl_ohs.log
add this in crontab:
0 0 * * * /home/oracle/scripts/cleanLOGSgrid.sh > /home/oracle/scripts/cleanLOGSgrid.log 2>&1
Script for cleaning Enterprise Manager 12c - Grid Control
#!/bin/sh

#find and clean Oracle 12c Agent log files older then 30 days

find /u01/oracle/midw/agent/agent_inst/sysman/log/ -name "gcagent.log.*" -mtime +30 -print|xargs rm
#find and clean Oracle 12c OMS log files older then 30 days
find /u01/oracle/midw/gc_inst/em/EMGC_OMS1/sysman/log/ -name "emoms.trc*" -mtime +30 -print|xargs rm
find /u01/oracle/midw/gc_inst/em/EMGC_OMS1/sysman/log/ -name "emctl.log.*" -mtime +30 -print|xargs rm
#find and clean Oracle 12c Oracle HTTP Server (OHS) log files older then 30 days
find /u01/oracle/midw/gc_inst/WebTierIH1/diagnostics/logs/OHS/ohs1/  -name "access_log*" -mtime +30 -print|xargs rm
find /u01/oracle/midw/gc_inst/WebTierIH1/diagnostics/logs/OHS/ohs1/  -name "em_upload_https_access_log*" -mtime +30 -print|xargs rm
find /u01/oracle/midw/gc_inst/WebTierIH1/diagnostics/logs/OHS/ohs1/  -name "ohs1-*.log" -mtime +30 -print|xargs rm
#find and clean Oracle 12c Oracle WebLogic log files older then 30 days
find /u01/oracle/midw/gc_inst/user_projects/domains/GCDomain/servers/EMGC_OMS1/logs/ -name "access.log*" -mtime +30 -print|xargs rm
find /u01/oracle/midw/gc_inst/user_projects/domains/GCDomain/servers/EMGC_OMS1/logs/ -name "EMGC_OMS1.log*" -mtime +30 -print|xargs rm
find /u01/oracle/midw/gc_inst/user_projects/domains/GCDomain/servers/EMGC_OMS1/logs/ -name "EMGC_OMS1.out*" -mtime +30 -print|xargs rm
find /u01/oracle/midw/gc_inst/user_projects/domains/GCDomain/servers/EMGC_OMS1/logs/ -name "EMGC_OMS1-diagnostic*.log" -mtime +30 -print|xargs rm
find /u01/oracle/midw/gc_inst/user_projects/domains/GCDomain/servers/EMGC_ADMINSERVER/logs -name "EMGC_ADMINSERVER.out*" -mtime +30 -print|xargs rm
find /u01/oracle/midw/gc_inst/user_projects/domains/GCDomain/servers/EMGC_ADMINSERVER/logs -name "GCDomain.log*" -mtime +30 -print|xargs rm
#find and clean Oracle 12c OPMN log files older then 30 days
/u01/oracle/midw/gc_inst/WebTierIH1/diagnostics/logs/OPMN/opmn
#find and clean Oracle 12c diagnose folder in oracle home log files older then 30 days
find /home/oracle/oradiag_oracle/diag/clients/user_oracle/host_1387324873_11/alert  -name "log_*.xml" -mtime +30 -print|xargs rm
#the next line is commented for know because on 12c I disabled the module according to metalink note:1396472.1
cat /u01/oracle/gc_inst/WebTierIH1/diagnostics/logs/OHS/ohs1/mod_wl_ohs.log>/u01/oracle/gc_inst/WebTierIH1/diagnostics/logs/OHS/ohs1/mod_wl_ohs_$DATE_VAR.log >/u01/oracle/gc_inst/WebTierIH1/diagnostics/logs/OHS/ohs1/mod_wl_ohs.log
add this in crontab:
0 0 * * * /home/oracle/scripts/cleanLOGSgrid.sh > /home/oracle/scripts/cleanLOGSgrid.log 2>&1
Hope this helps.
-Thanks
Geek DBA
Once the grid agent has been installed on target servers, we have to log to Grid control and configure the targets located by the agent,
in order to collect the metrics by agent and upload to OMS, (typically dbnsmp password etc to be provided) other wise the in GUI you will see metric collection errors
We have two options to configure the metric collections for the targets
Option 1:- Log to grid control and click on databases and then click on your respective database,
Go to Target --> Databases --> Select your database target --> Configure.
At a minimum, update DBSNMP password and verify/change listener port.
If the database to be configured is not shown in the list of available targets,
Click Add Database, provide HOST name and OEMGC will discover all databases on that host.
Some times you do not have a sysman password or the authentication password to log into OMS, in this cases you can use manual approach via emcli by logging into target server where you want to configure. Here is the second option.
Option 2:- Configure the targets manually via command line using emcli config agent
1) $AGENT_HOME/emctl config agent list_targets, identify the targets known to that agent
From the list target, pick the name of the target and type and use in step 2 below.
For Example:-
$AGENT_HOME/bin/emctl config agent list_targets
Oracle Enterprise Manager 11g Release 1 Grid Control 11.1.0.1.0
Copyright (c) 1996, 2010 Oracle Corporation. All rights reserved.
[targetserver:3872, oracle_emd]
[CRS_11g_Prod, cluster]
[targetserver, host]
[11gr2_RAC1, oracle_database]
[+ASM1_targetserver, osm_instance]
[TEST_TEST, oracle_database]
[LISTENER_targetserver_targetserver, oracle_listener]
[LISTENER_targetserver0_targetserver, oracle_listener]
2) Config agent credentials for target type oracle_database
(though they were rac_database , configure under oracle_database target type only)
Rac Node 2: Instance TEST1
oracle@targetserver1:/u01/gi/Agent11g/agent11g/bin>
./emctl config agent credentials TEST_TEST1:oracle_database
Oracle Enterprise Manager 11g Release 1 Grid Control 11.1.0.1.0
Copyright (c) 1996, 2010 Oracle Corporation. All rights reserved.
Name = TEST_TEST, Type = oracle_database
Want to change for "UserName" (y/n):n
Want to change for "password" (y/n):y
Enter the new value for "password" :********
Re-enter the new value for "password" :********
EMD reload completed successfully
Rac Node 2: Instance TEST2
oracle@targetserver2:/u01/gi/Agent11g/agent11g/bin>
./emctl config agent credentials TEST_TEST2:oracle_database
Oracle Enterprise Manager 11g Release 1 Grid Control 11.1.0.1.0
Copyright (c) 1996, 2010 Oracle Corporation. All rights reserved.
Name = TEST_TEST, Type = oracle_database
Want to change for "UserName" (y/n):n
Want to change for "password" (y/n):y
Enter the new value for "password" :********
Re-enter the new value for "password" :********
EMD reload completed successfully
Non - RAC database RAC1
oracle@targetserver:/u01/gi/Agent11g/agent11g/bin>
./emctl config agent credentials 11gr2_RAC1:oracle_database
Oracle Enterprise Manager 11g Release 1 Grid Control 11.1.0.1.0
Copyright (c) 1996, 2010 Oracle Corporation. All rights reserved.
Name = TEST_TEST, Type = oracle_database
Want to change for "UserName" (y/n):n
Want to change for "password" (y/n):y
Enter the new value for "password" :********
Re-enter the new value for "password" :********
-Thanks
Geek DBA
We may need sometimes to export or import the monitoring templates in Oracle grid control from one environment to new environment, for example when you upgrade or a new OMS infrastructure has been built, in this case the emcli export/import will help you to copy the monitoring templates between environments, lets see how to do it.
1) Log into emcli (sysman)
2) exporting from UAT environment
emcli export_template -name="TEST skeleton listener" -target_type=oracle_listener > TEST_listener.xml
emcli export_template -name="TEST skeleton db instance" -target_type=oracle_database > TEST_db.xml
emcli export_template -name="TEST skeleton rac" -target_type=rac_database > TEST_rac.xml
emcli export_template -name="TEST skeleton host" -target_type=host > TEST_host.xml
emcli export_template -name="TEST skeleton cluster" -target_type=cluster > TEST_cluster.xml
emcli export_template -name="TEST skeleton ASM" -target_type=osm_instance > TEST_asm.xml
emcli export_template -name="TEST skeleton agent" -target_type=oracle_emd > TEST_agent.xml
3) importing into Production environment after logging into emcli in OMS
emcli import_template -files="TEST_listener.xml;TEST_db.xml;
TEST_rac.xml;TEST_host.xml;TEST_cluster.xml;TEST_asm.xml;TEST_agent.xml"
4) Assign the new templates to them from OEMGC Console GUI, in a controlled manner.
In OEM, navigate to Setup -> Monitoring Templates
Choose the radio button against the standard template of your target type, and Click --> Apply.
Under --> Destination Targets--> , click --> Add.
Check the databases that you want this template to be applied to, and Click ->Select .
Click OK.
Reference:-
How To Export , Import Templates via emcli Utility. (Doc ID 740806.1)
1) Find templates in source Repository database. Connect to the repository Database as
SYSMAN and execute the following SQL statement.
SQL> select TARGET_TYPE,TEMPLATE_NAME from MGMT_TEMPLATES where TEMPLATE_NAME like '%TEMPLATE NAME%';
2) Export template from source environment.
$ emcli export_template -name=Host -target_type=host -output_file=Host.XML
$ emcli export_template -name=Listener -target_type=listener -output_file=Listener.XML
$ emcli export_template -name=Database -target_type=oracle_database -output_file=Database.XML
3) Copy file to another server, with emcli configured for target environment.
4) Import exported template at target environment.
$ emcli import_template -files=Host.XML
$ emcli import_template -files=Listener.XML
$ emcli import_template -files=Database.XML
Hope this helps
-Thanks
Geek DBA
As you aware spfile located in asm disks only starting 11gR2 in cluster environment.
When CRSD need to start the various resources of the node or updates it changes in OCR. the location of spfile also should known to crsd.
Here the gpnp profile comes into handy. (read more here for gpnp)
The order of searching for spfile is,
- GPnP profile
- ORACLE_HOME/dbs/spfile<sid.ora>
- ORACLE_HOME/dbs/init<sid.ora>
For example if my gpnp profile contains the spfile location as ASM disk group
Sample profile.xml in $GRID_HOME/gpnp/profiles/peer.
[root@host01 peer]# gpnptool get
<?xml version="1.0" encoding="UTF-8"?><gpnp:GPnP-Profile Version="1.0" xmlns="http://www.grid-pnp.org/2005/11/gpnp-profile" xmlns:gpnp="
.....
ClusterName="cluster01" PALocation=""><gpnp:Network-Profile><gpnp:HostNetwork id="gen" HostName="*"><gpnp:Network id="net1" IP="192.9.201.0" Adapter="eth0" Use="public"/><gpnp:Network id="net2" IP="10.0.0.0" Adapter="eth1" Use="cluster_interconnect"/></gpnp:HostNetwork></gpnp:Network-Profile><orcl:CSS-Profile id="css" DiscoveryString="+asm" LeaseDuration="400"/><orcl:ASM-Profile id="asm" DiscoveryString="" SPFile="+DATA/cluster01/asmparameterfile/registry.253.783619911"/>
....
</gpnp:GPnP-Profile>
Or using the gpnptool, find the spfile location.
[grid@host01 peer]$ gpnptool getpval -asm_spf
Warning: some command line parameters were defaulted. Resulting command line:
/u01/app/11.2.0/grid/bin/gpnptool.bin getpval -asm_spf -p=profile.xml -o-
+DATA/cluster01/asmparameterfile/registry.253.793721441
The output of the query shows that SPfile is on ASM in DATA diskgroup. To find out the
location of ASM disks, do the following
[root@host01 peer]# gpnptool getpval -asm_dis
ASM-Profile id="asm" DiscoveryString=""
Note the discovery string is empty, means all the disks of ASM (in /dev/oracleasm/disks) will be scanned for spfile.
[root@host01 ~]# kfed read /dev/sdb3 | grep -E 'spf|ausize'

kfdhdb.ausize:                  1048576 ; 0x0bc: 0x00100000
kfdhdb.spfile:                       16 ; 0x0f4: 0x00000010
kfdhdb.spfflg:                        1 ; 0x0f8: 0x00000001
In the output above, we see that
kfed is the utility resides in ORACLE_HOME/bin which can read the disk header
the device /dev/sdb1 contains a copy of the ASM spfile (spfflg=1).
The ASM spfile location starts at the disk offset of 16 (spfile=16)
Considering the allocation unit size (kfdhdb.ausize = 1M), let's dump the ASM spfile from the device:
[root@host01 ~]# dd if=/dev/sdb3 of=spfileASM_Copy2.ora skip=16 bs=1M count=1
1+0 records in
1+0 records out
1048576 bytes (1.0 MB) copied, 0.170611 seconds, 6.1 MB/s
[root@host01 ~]# strings spfileASM_Copy2.ora
+ASM1.__oracle_base='/u01/app/grid'#ORACLE_BASE set from in memory value
+ASM2.__oracle_base='/u01/app/grid'#ORACLE_BASE set from in memory value
+ASM3.__oracle_base='/u01/app/grid'#ORACLE_BASE set from in memory value
+ASM3.asm_diskgroups='FRA'#Manual Mount
+ASM2.asm_diskgroups='FRA'#Manual Mount
+ASM1.asm_diskgroups='FRA'#Manual Mount
*.asm_power_limit=1
*.diagnostic_dest='/u01/app/grid'
*.instance_type='asm'
*.large_pool_size=12M
*.remote_login_passwordfile='EXCLUSIVE'
Now we have got the spfile from the asm disk directly, you can create your own pfile etc. Same case applies to rdbms spfile too.
-Thanks
Geek DBA
In 11gR2, Oracle has introduced a cache called flash cache which is a secondary cache of the buffer cache. This flash cache is resides in L2 Cache of the system (RAM) and can be very fast compare to the disk. The SSD disks which gives you the benefit of high speed disks , the same benefit with flash cache. To read / write quicker in the memory and send it later to disk (i.e magnetic disk) as and when the dbwr is free.
So with Exadata (as its hardware consists of flash cache memory) we can leverage the same flash cache a secondary db buffer cache, where in with one patch below you can simulate the same using the cheap pen drive for testing purposes.
Before proceed further, with flash cache how does the block traverse when it has flash cache (the diagram below has been grabbed from Guy harrison’s blog to have better understanding of this process, Thank to Guy).
So the lifecycle of a block looks something like this:
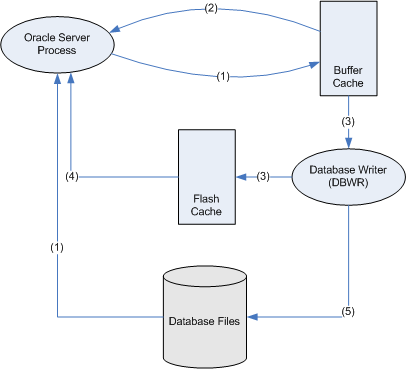
- The Oracle server process reads a file from disk and adds it to the buffer cache
- If a session wants that block later and it's still in the buffer cache, they can read it from the buffer cache
- Before the block leaves the buffer cache the DBWR will write it to the flash cache (if the DBWR is not too busy)
- If a session want a block later and it's still in the flash cache, then they will read it from the flash cache (and presumably place it back in the buffer cache)
- If the block is modified, the DBWR will eventually write it back to the disk. (Q: What happens to any unmodified copies of that block in the flash cache?)
Verify the flash cache usage in my database, Flash cache column has null values
  SELECT   owner || '.' || object_name object,
           SUM (CASE WHEN b.status LIKE 'flash%' THEN 1 END) flash_blocks,
           SUM (CASE WHEN b.status LIKE 'flash%' THEN 0 else 1 END) cache_blocks,
           count(*) total_blocks
    FROM       v$bh b
           JOIN
               dba_objects
           ON (objd = object_id)
GROUP BY   owner, object_name
order by 4 desc


SQL> /

OBJECT                      FLASH_BLOCKS CACHE_BLOCKS TOTAL_BLOCKS
--------------------------- ------------ ------------ ------------
SYS.C_OBJ#                                      1330         1330
SYS.OBJ$                                         888          888
SYS.I_OBJ2                                       740          740
SYS.IDL_UB1$                                     349          349
SYS.C_FILE#_BLOCK#                               263          263
SYS.IDL_UB2$                                     177          177
SYS.TRIGGER$                                     104          104
SYS.C_OBJ#_INTCOL#                               100          100
SYS.I_OBJ1                                        73           73
SYS.HIST_HEAD$                                    50           50
SYS.I_DEPENDENCY1                                 48           48
Demo:-
1) Apply the patch, 9352237 on top of 11.2.0.1
2) Create a directory for your pendrive to mount
mkdir /mnt/usbflash
3) Add a line in fstab
/dev/sdc1 /mnt/usbflash vfat noauto,users,rw,umask=0 0 0
The device name /dev/sdc1 can be differ according to your environment
4) Set the database parameters
alter system set db_flash_cache_file=’/mnt/usbflash/oraflashcache.dat;
alter system set db_flash_cache_size=1000m;
Note: the flash cache file should be on flash drive (pendrive) only.
5) Restart the DB
6) Do some transactions or let get the db heated. (just after sometime I mean)
7) Verify that flash cache is used.
  SELECT   owner || '.' || object_name object,
           SUM (CASE WHEN b.status LIKE 'flash%' THEN 1 END) flash_blocks,
           SUM (CASE WHEN b.status LIKE 'flash%' THEN 0 else 1 END) cache_blocks,
           count(*) total_blocks
    FROM       v$bh b
           JOIN
               dba_objects
           ON (objd = object_id)
GROUP BY   owner, object_name
order by 4 desc


SQL> /

OBJECT                      FLASH_BLOCKS CACHE_BLOCKS TOTAL_BLOCKS
--------------------------- ------------ ------------ ------------
SYS.C_OBJ#                        1010           320         1330
SYS.OBJ$                           777          1111         1888
SYS.I_OBJ2                         295           740         1035
SYS.IDL_UB1$                       780           349         1129
SYS.C_FILE#_BLOCK#                 540           263          803
The flash cache can be cool feature for an OLTP systems where you have many contention on buffers and the aged out happens quickly. But as Guy’s said the write performance can be poorer compare to reads.
-Thanks
Geek DBA
|
Follow Me!!!