All information is offered in good faith and in the hope that it may be of use for educational purpose and for Database community purpose, but is not guaranteed to be correct, up to date or suitable for any particular purpose. db.geeksinsight.com accepts no liability in respect of this information or its use.
This site is independent of and does not represent Oracle Corporation in any way. Oracle does not officially sponsor, approve, or endorse this site or its content and if notify any such I am happy to remove.
Product and company names mentioned in this website may be the trademarks of their respective owners and published here for informational purpose only.
This is my personal blog. The views expressed on these pages are mine and learnt from other blogs and bloggers and to enhance and support the DBA community and this web blog does not represent the thoughts, intentions, plans or strategies of my current employer nor the Oracle and its affiliates or any other companies. And this website does not offer or take profit for providing these content and this is purely non-profit and for educational purpose only.
If you see any issues with Content and copy write issues, I am happy to remove if you notify me.
Contact Geek DBA Team, via geeksinsights@gmail.com
We recently incorporated IPSec Tunnel and Transit VPC for our project to simplify our Network connectivity between different AWS Accounts and different VPC's.
AWS provides a great flexibility of architecturing your network infrastructure either in terms of Security, flexibility and simplicity.
Whether it is from Security or Infrastructure architect perspective, it is ideal to have lesser public facing endpoints in the cloud. An ideal scenario would be to have all non-production resources are to be accessible only via Corporate network. However, it could be challenging if there are multiple non-production environments such as Integration, Configuration, Development, Test, Staging, User-Acceptance Test and so on.
The most common practice would be to setup a multiple Direct Connects or VPN connections to various VPCs. This would be less economical and multiple external routes from the corporate network. This can be overcome by the usage of the concept of Transit VPC in conjunction of IPSec tunnel.
Take a reference as if you have requirement of setting up a site-to-site VPN between a main and branch office. The end objective would be site office being able to reach file server in local network of main office.
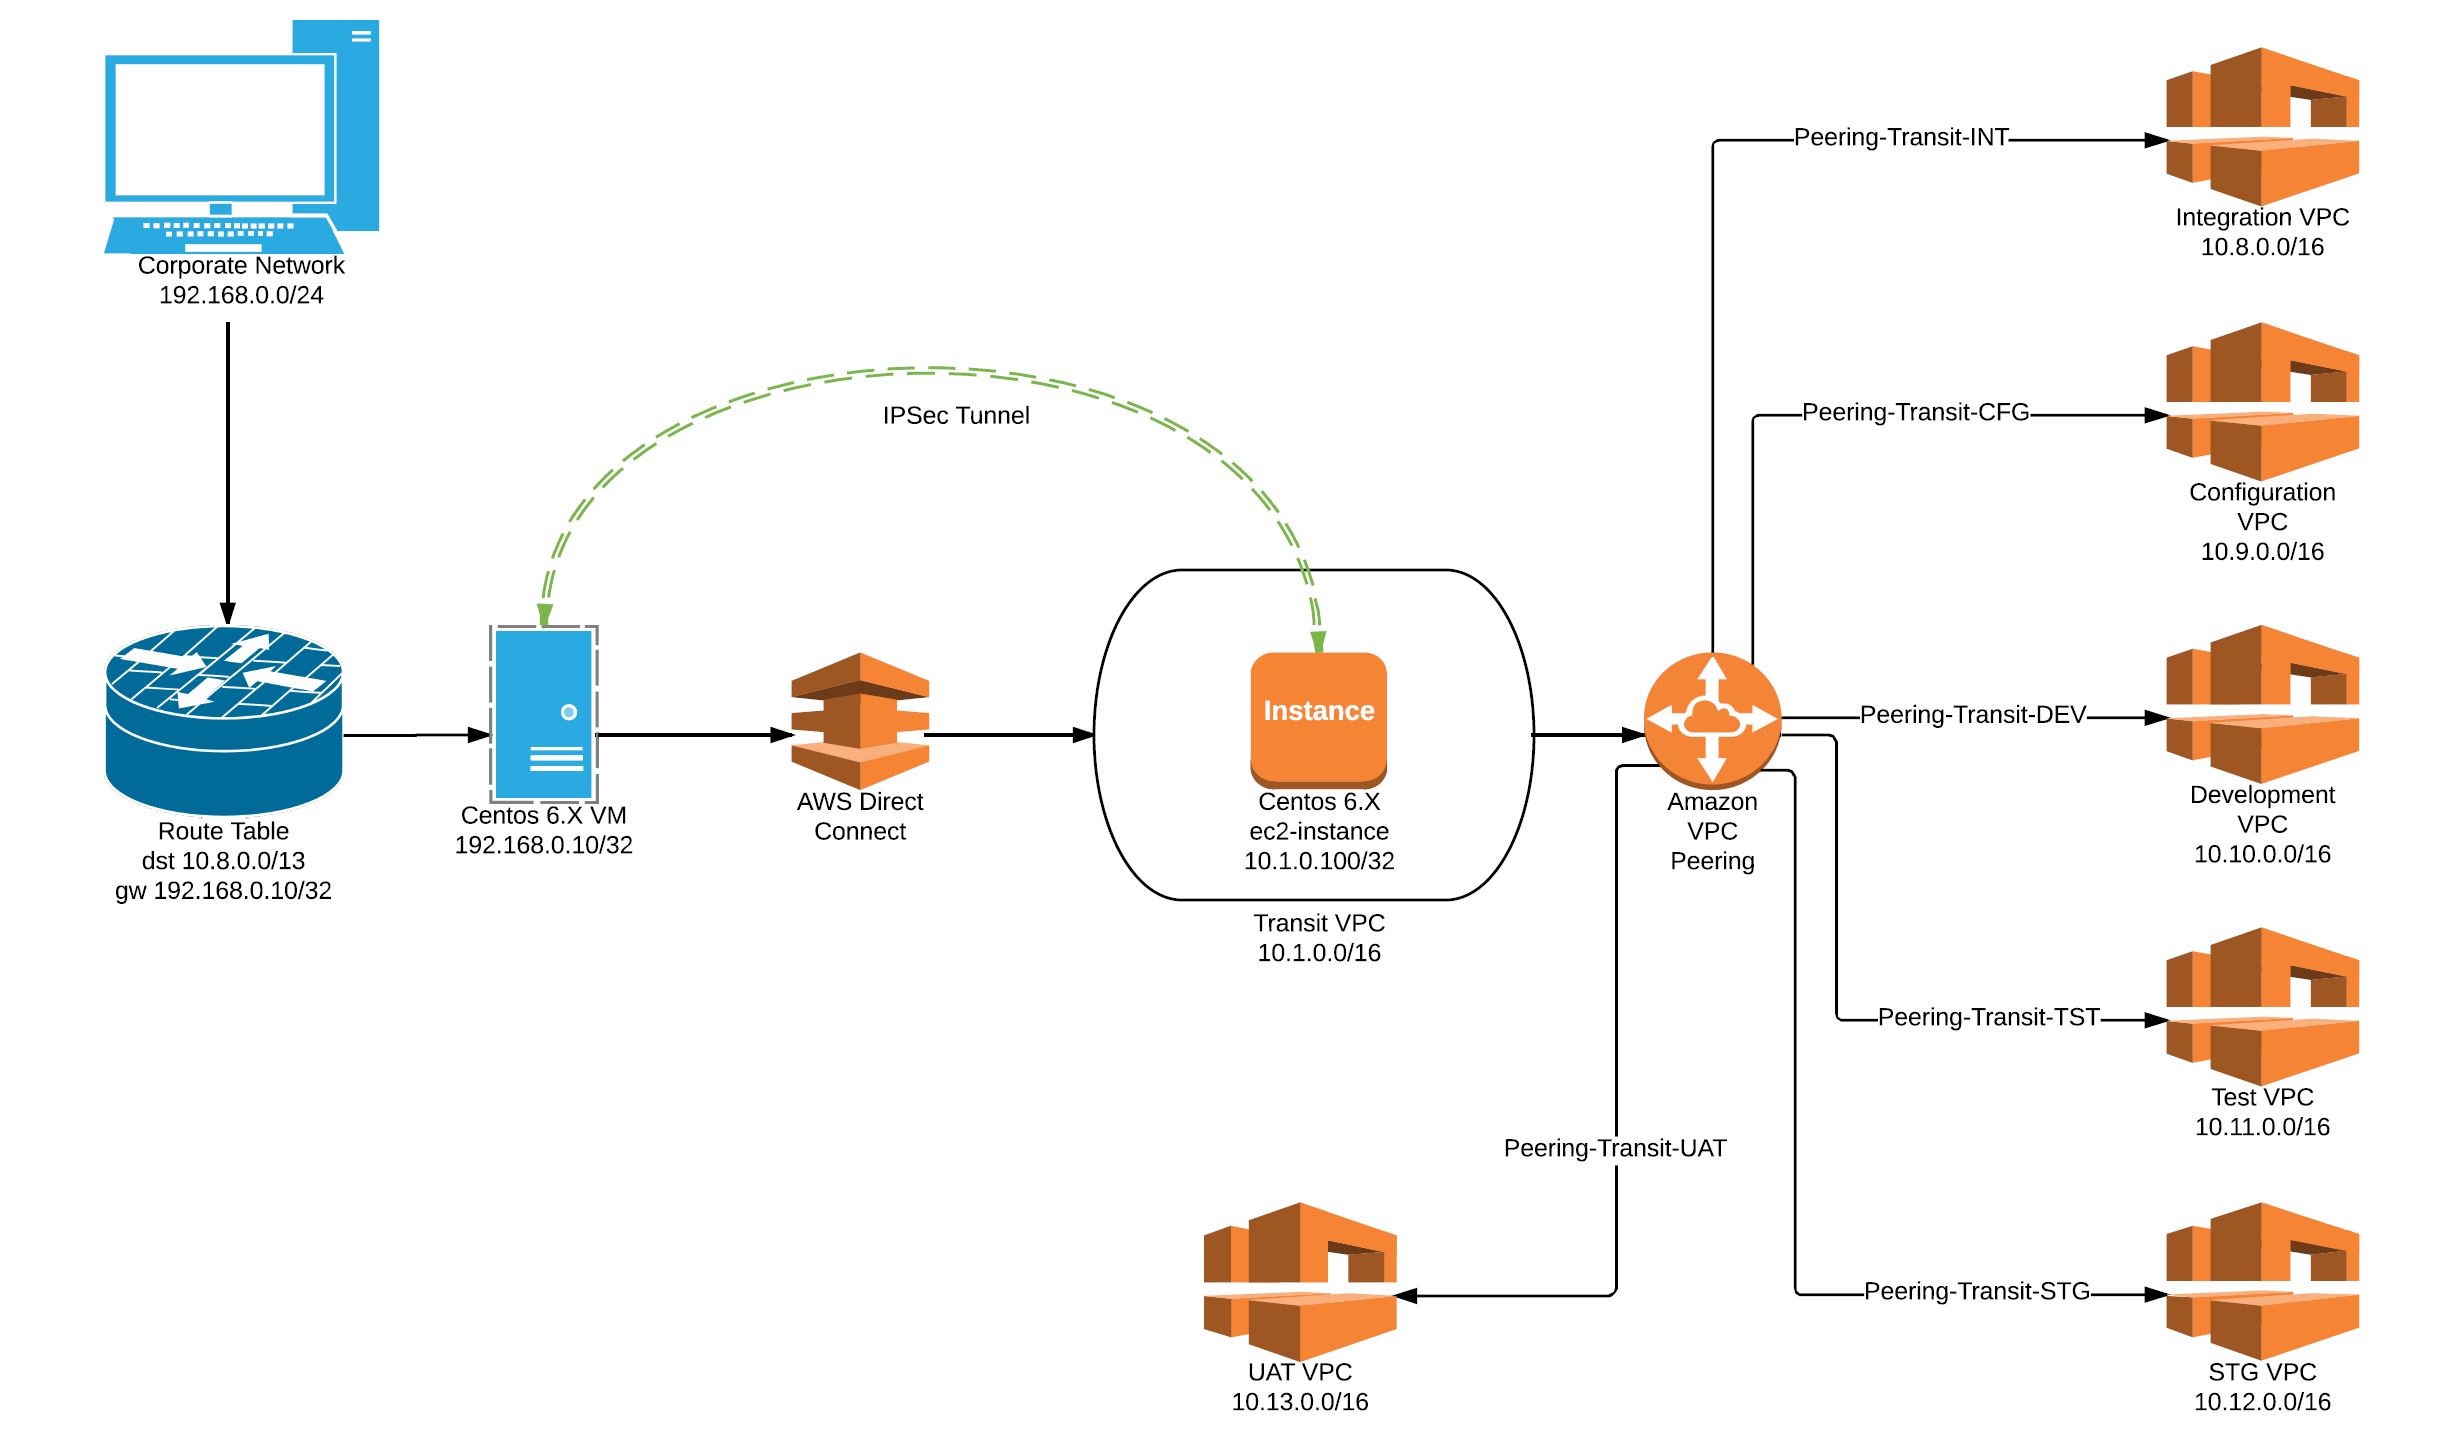
The concept of Transit VPC is like all traffic from the corporate network would route to this VPC through a Direct Connect. This would further peer to non-production VPCs. An EC2 instance can be launched in the private subnet of the Transit VPC with IPSec Tunnel configured. On the other hand, either a physical or VM can would be configured with IPSec Tunnel which eventually establishes an IPSec Tunnel over Direct Connect.
I will present a scenario with the following resources:
Corporate network: 192.168.0.0/24
Transit VPC: 10.1.0.0/16
Linux VM (Centos 6.X) in corporate network: 192.168.0.10
Linux Ec2 instance in Transit VPC: 10.1.0.100
Integration VPC: 10.8.0.0/16
Configuration VPC: 10.9.0.0/16
Development VPC: 10.10.0.0/16
Test VPC: 10.11.0.0/16
Staging VPC: 10.12.0.0/16
UAT VPC: 10.13.0.0/16
Openswan tool to setup IPSec tunnel
Here is how it can be configured:
Step 1: Establish Direct Connect
Ensure you have Direct Connect establish between your corporate network and a transit VPC. This means any resource on Transit VPC are routable via Direct Connect. In this case, test the network connectivity from 192.168.0.0/24 to 10.1.0.0/16
Step 2: VPC peering
You can peer VPC as follows:
Peering connection name tag: Peering-Transit-DEV
VPC (Requester): vpc-id of Transit VPC 10.1.0.0/16
VPC (Accepter): vpc-id of Development VPC 10.10.0.0/16
Once created Peering Connection, you need to “Accept Request” for the peering.
Repeat the same process for the rest of the VPCs (Integration, Configuration, Test, Staging and UAT)
For example:
Peering Connection
Peering ID
Peering-Transit-INT
pcx-abcd1234
Peering-Transit-CFG
pcx-abcd5678
Peering-Transit-DEV
pcx-cdef1234
Peering-Transit-TST
pcx-cdef5678
Peering-Transit-STG
pcx-fedc0987
Peering-Transit-UAT
pcx-fedc7890
Step 3: Configure IPSec Tunnel
Using an Open Source tool OpenSwan, you can configure a IPSec Tunnel between a VM in corporate network and an ec2-instance in Transit VPC. In this example, I have used Pre-shared key. The following are the primary configs:
$cat /etc/ipsec.d/awsvpc.conf
              conn awsvpc
            type=tunnel
             authby=secret
            mtu=1436
            keyingtries=3
            left=192.168.0.10
            leftsubnets={192.168.0.0/24}
            leftnexthop=%defaultroute
            right=10.1.0.100
            rightsubnets={10.8.0.0/13}
            rightnexthop=%defaultroute
            auto=start
$cat /etc/ipse.d/ipsec.secrets
             %any %any : PSK "*********************"
$ cat /etc/ipsec.conf
             config setup
            nat_traversal=yes
            virtual_private=%v4:10.92.168.0.0/24,%v4:10.8.0.0/13
              include /etc/ipsec.d/*.conf

Please note: 10.8.0.0/13 would cover the range from 10.8.0.0 to 10.15.255.255
Step 4: Update Static route for non-prod VPCs:
All traffic to non-prod VPCs will traverse through an on-prem VM.
Hence a static route needs to be configured at the corporate router as follows:
Source
Destination
Gateway
192.168.0.0/24
10.8.0.0/13
192.168.0.10/32
This means any traffic from corporate network 192.168.0.0/24 with destination to 10.8.0.0/16, 10.9.0.0/16, 10.10.0.0/16, 10.11.0.0/16, 10.12.0.0/16 and 10.13.0.0/16 will be routed through a VM 192.168.0.10.
Step 5: Configure Route Table:
For the given subnet inside Transit VPC, create a route table as follows:
Destination
Target
10.1.0.0/16
local
10.8.0.0/16
pcx-abcd1234
10.9.0.0/16
pcx-abcd5678
10.10.0.0/16
pcx-cdef1234
10.11.0.0/16
pcx-cdef5678
10.12.0.0/16
pcx-fedc0987
10.13.0.0/16
pcx-fedc7890
For the given subnet inside Development VPC, create route table as follows:
Destination
Target
10.1.0.0/16
pcx-cdef1234
Repeat same process for rest of the VPC in INT, CFG, TST, STG and UAT.
Step 6: Configure Security Groups:
Finally, configure Security Groups for each subnet required to be accessible from the corporate network.
Type
Protocol
Port Range
Source
HTTP
TCP
80
Custom
192.168.0.0/24
SSH
TCP
22
Custom
192.168.0.0/24
All-ICMPv4
ICMP
0-65535
Custom
192.168.0.0/24
RDP
TCP
3389
Custom
192.168.0.0/24
On completion of all six steps, you should be able to access AWS resources in non-production VPCs as per defined in Security Groups.
Back in Nov 2016, Microsoft has announced SQL Server on Linux and being a Database enthusiast I would like to hands on and see how it works, but I am been busy with some other projects and could not look into it. Last week I had a conversation with one of my peer in lift and he asked me a question how it works that reminds me this topic again. My first answer to him was , there must be some component or a process which converts a windows calls from SQL platform to Linux abstraction layer which is must, the second in the list was compatibility workarounds. Without looking into any document I was sure about it since Microsoft (or anyone) would never do a overhaul or rewrite SQL Server Platform into Linux. Well, they found themselves with internal projects which offers the bridge between Windows and Linux called "DrawBridge" and evolved something called "SQLPAL" to make sqlserver platform work on linux.
And after reading it, I decided to give a go with installation and see compatibility for features especially with clients and other integration tools we use.
I have spinned up an ec2 instance (RHEL 7.4, doc says 7.3) with atleast 2cpu and 7gb of memory with RHEL 7.3 and the script here does the following list of things if your server can connect to internet. I do not want to reinvent the wheel to create my own scripts etc to save sometime, so I have decided to use this script as is.
Install sql server package
Configure sqlserver using msql-conf utiliaty
Create login user
Create Database
And Script worked like charm, It took just less than 4 mins (the size of package was 175 m) to install and configure the SQL Server and SQL Server Agent. (contrary to Windows installation of dependencies , .net framework etc etc)
Complete!
Configuring firewall to allow traffic on port 1433...
sudo: firewall-cmd: command not found
sudo: firewall-cmd: command not found
Restarting SQL Server...
Waiting for SQL Server to start...

------------------------------------------------------------------------------------------------------------------------------------------------------------------------------------------------------------------------------------------------------------------------------------------------------------
Microsoft SQL Server 2017 (RC2) - 14.0.900.75 (X64)
        Jul 27 2017 08:53:49
        Copyright (C) 2017 Microsoft Corporation
        Enterprise Evaluation Edition (64-bit) on Linux (Red Hat Enterprise Linux Server 7.4 (Maipo))

(1 rows affected)
Done!
Second, connecting database through sqlcmd tool, Add the /opt/msssql-tools/bin to environment
[root@ip-****** ~]# echo 'export PATH="$PATH:/opt/mssql-tools/bin"' >> ~/.bash_profile
[root@ip-****** ~]# source .bash_profile
[root@ip-****** ~]# sqlcmd
Microsoft (R) SQL Server Command Line Tool
Version 13.1.0007.0 Linux
Copyright (c) 2012 Microsoft. All rights reserved.

usage: sqlcmd            [-U login id]          [-P password]
  [-S server or Dsn if -D is provided]
  [-H hostname]          [-E trusted connection]
  [-N Encrypt Connection][-C Trust Server Certificate]
  [-d use database name] [-l login timeout]     [-t query timeout]
  [-h headers]           [-s colseparator]      [-w screen width]
  [-a packetsize]        [-e echo input]        [-I Enable Quoted Identifiers]
  [-c cmdend]
  [-q "cmdline query"]   [-Q "cmdline query" and exit]
  [-m errorlevel]        [-V severitylevel]     [-W remove trailing spaces]
  [-u unicode output]    [-r[0|1] msgs to stderr]
  [-i inputfile]         [-o outputfile]
  [-k[1|2] remove[replace] control characters]
  [-y variable length type display width]
  [-Y fixed length type display width]
  [-p[1] print statistics[colon format]]
  [-R use client regional setting]
  [-K application intent]
  [-M multisubnet failover]
  [-b On error batch abort]
  [-D Dsn flag, indicate -S is Dsn]
  [-X[1] disable commands, startup script, environment variables [and exit]]
  [-x disable variable substitution]
  [-? show syntax summary]
Next , stop and start and status of service.
[root@ip-***** ~]# sudo systemctl restart mssql-server
[root@ip-***** ~]# sudo systemctl status mssql-server
● mssql-server.service - Microsoft SQL Server Database Engine
   Loaded: loaded (/usr/lib/systemd/system/mssql-server.service; enabled; vendor preset: disabled)
   Active: active (running) since Sun 2017-08-27 11:53:23 UTC; 10s ago
     Docs: https://docs.microsoft.com/en-us/sql/linux
 Main PID: 1502 (sqlservr)
   CGroup: /system.slice/mssql-server.service
           ├─1502 /opt/mssql/bin/sqlservr
           └─1504 /opt/mssql/bin/sqlservr
Next, I forgot my sa login password, hence reset needed, run a script mssql-conf with set-sa-password it will ask the password.
[root@ip-***** ~]# /opt/mssql/bin/mssql-conf set-sa-password
Enter the SQL Server system administrator password:
Confirm the SQL Server system administrator password:
Configuring SQL Server...

This is an evaluation version.  There are [149] days left in the evaluation period.
The system administrator password has been changed.
Please run 'sudo systemctl start mssql-server' to start SQL Server.
Finally, log into database using sqlcmd
[root@ip-****** ~]# sqlcmd -S localhost -U sa -P ***** -d master -Q "select name, database_id from sys.databases"
name                                                                                                                             database_id
-------------------------------------------------------------------------------------------------------------------------------- -----------
master                                                                                                                                     1
tempdb                                                                                                                                     2
model                                                                                                                                      3
msdb                                                                                                                                       4
geekdb                                                                                                                                     5

(5 rows affected)
And also logged through SSMS as well.
You can set some configuration using mssql-conf tool. The following configuration can be done
Collation
Set a new collation for SQL Server on Linux.
Customer feedback
Choose whether or not SQL Server sends feedback to Microsoft.
Default data directory
Change the default directory for new SQL Server database data files (.mdf).
Default log directory
Changes the default directory for new SQL Server database log (.ldf) files.
Default dump directory
Change the default directory for new memory dumps and other troubleshooting files.
Default backup directory
Change the default directory for new backup files.
Dump type
Choose the type of dump memory dump file to collect.
High availability
Enable Availability Groups.
Local Audit directory
Set a a directory to add Local Audit files.
Locale
Set the locale for SQL Server to use.
Memory limit
Set the memory limit for SQL Server.
TCP port
Change the port where SQL Server listens for connections.
TLS
Configure Transport Level Security.
Traceflags
Set the traceflags that the service is going to use.
My Final go to install SSIS package,
[root@********* ~]# curl https://packages.microsoft.com/config/rhel/7/mssql-server.repo > /etc/yum.repos.d/mssql-server.repo
  % Total    % Received % Xferd  Average Speed   Time    Time     Time  Current
                                 Dload  Upload   Total   Spent    Left  Speed
100   220  100   220    0     0    100      0  0:00:02  0:00:02 --:--:--   100
[root@ip-******** ~]# sudo yum install -y mssql-server-is
Loaded plugins: amazon-id, rhui-lb, search-disabled-repos
packages-microsoft-com-mssql-server                                                                                                                       | 2.9 kB  00:00:00
Resolving Dependencies


Installed:
  mssql-server-is.x86_64 0:14.0.900.75-1

Complete!
Run setup,
[root@******* ~]# sudo /opt/ssis/bin/ssis-conf setup
The license terms for this product can be downloaded from:
https://go.microsoft.com/fwlink/?LinkId=852741&clcid=0x409

The privacy statement can be viewed at:
https://go.microsoft.com/fwlink/?LinkId=853010&clcid=0x409

Do you accept the license terms? [Yes/No]:yes

Choose an edition of SSIS:
  1) Evaluation (free, no production use rights, 180-day limit)
  2) Developer (free, no production use rights)
  3) Express (free)
  4) Web (PAID)
  5) Standard (PAID)
  6) Enterprise (PAID)
  7) I bought a license through a retail sales channel and have a product key to enter.

Details about editions can be found at
https://go.microsoft.com/fwlink/?LinkId=852748&clcid=0x409

Use of PAID editions of this software requires separate licensing through a
Microsoft Volume Licensing program.
By choosing a PAID edition, you are verifying that you have the appropriate
number of licenses in place to install and run this software.

Enter your edition(1-7): 1
Only user in 'ssis' group can run 'dtexec' on Linux. Do you want to add current user into 'ssis' group? [Yes/No]:yes
Please logout to reload the group information.
SSIS telemetry service is now running.
Setup has completed successfully.
SSIS Telemetry services running
[root@****** ~]# ps -eaf | grep tele
root      2958     1  1 12:26 ?        00:00:00 /opt/ssis/bin/ssis-telemetry
root      2977  2958 20 12:26 ?        00:00:06 /opt/ssis/bin/ssis-telemetry
root      3106  3086  0 12:26 pts/1    00:00:00 grep --color=auto tele

And we can run SSIS package using , will explore that later more.

dtexec /F <package name> /DE <protection password>

Bingo, everything is transparent , the bridge between SQL Platform and Underlying OS. You will not know what you are running behind.
We want to report general audit report daily from our databases who have made manual modifications to the database so it may be helpful for us to retrospect when needed.
cat Download_Audit_Files.sh

########################################
#Configuration
########################################
AUDITLOGDATE=`date +"%Y%m%d" --date="$2 days ago"`
AUDIT_DIR=/backups/washexports/audit
S3BUCKET=s3://databaselogs.geeksinsight.com/database/audit/$1/
DBUSERNAME=dbmanager
DBPASSWORD=password
SCRIPT_DIR=${SCRIPTS_DIR}
MAIL_RECEIPIENT=DBAUDIT mail@123.com,mail2@123.com

#######################################
# Export variables
#######################################
export AWS_DEFAULT_REGION=ap-southeast-2
export ORACLE_HOME=/opt/oracle/app/oracle/product/11.2.0/client_1
export PATH=/usr/local/rvm/gems/ruby-2.1.5/bin:/usr/local/rvm/gems/ruby-2.1.5@global/bin:/usr/local/rvm/rubies/ruby-2.1.5/bin:/usr/lib64/qt-3.3/bin:/opt/aws/bin:/usr/local/sbin:/usr/local/bin:/sbin:/bin:/usr/sbin:/usr/bin:/opt/oracle/app/oracle/product/11.2.0/client_1/bin:/usr/local/rvm/bin:/root/bin

##############################################
# Download the xml files for given instance
##############################################

for var in `aws rds describe-db-log-files --db-instance-identifier $1 --filename-contains "xml" | grep LogFileName | sort -r |  cut -d '"' -f4- |rev | cut -c 3- | rev | grep _$AUDITLOGDATE`
do
aws rds download-db-log-file-portion --db-instance-identifier $1 --log-file-name $var  --max-items 99999999 --starting-token 0 --output text >> ${AUDIT_DIR}/${AUDITLOGDATE}_$1.xml
done


######################################
# Cleanse the Audit Files
######################################
#sed -i '/pscs/d' ${AUDIT_DIR}/${AUDITLOGDATE}_$1.xml
sed -i '/<\/Audit>/d' ${AUDIT_DIR}/${AUDITLOGDATE}_$1.xml
sed -i '/<\/AuditRecord>/d' ${AUDIT_DIR}/${AUDITLOGDATE}_$1.xml
sed -i '/xml/d' ${AUDIT_DIR}/${AUDITLOGDATE}_$1.xml
sed -i '/Version/d' ${AUDIT_DIR}/${AUDITLOGDATE}_$1.xml
sed -i -e 's/<\/DBID>/<\/DBID><\/AuditRecord>/g' ${AUDIT_DIR}/${AUDITLOGDATE}_$1.xml
vim -e ${AUDIT_DIR}/${AUDITLOGDATE}_$1.xml <<@@@
g/truncated/.-1,.d
wq
@@@
sed -i '1i\'"<root><Audit>" ${AUDIT_DIR}/${AUDITLOGDATE}_$1.xml
sed -i '$ a\'"</Audit></root>" ${AUDIT_DIR}/${AUDITLOGDATE}_$1.xml

##################################################################
# Generate report using analyze2.py python script
# YOu may need to further customize the script as per your needs
##################################################################
cd ${AUDIT_DIR}
${SCRIPTS_DIR}/audit/analyze2.py ${AUDITLOGDATE}_$1.xml >> ${SCRIPTS_DIR}/logs/Audit_Process_${AUDITLOGDATE}_$1.log
SIZE=`ls -ltr ${AUDIT_DIR}/${AUDITLOGDATE}_$1.xml | tr -s ' ' | cut -d ' ' -f 5`

##################################################################
#Send Email of the report
###################################################################

cat /scripts/db_reconfiguration/logs/Audit_Process_${AUDITLOGDATE}_$1.log | mailx -s "Campus Database Audit Log - ${AUDITLOGDATE}" -a "/scripts/db_reconfiguration/logs/Audit_Process_${AUDITLOGDATE}_$1.log" -r ${MAIL_RECEIPIENT}

###########################################
# Copy final audit xml file to S3 Bucket
###########################################
gzip ${AUDIT_DIR}/${AUDITLOGDATE}_$1.xml
aws s3 cp ${AUDIT_DIR}/${AUDITLOGDATE}_$1.xml.gz ${S3BUCKET}
rm -f ${AUDIT_DIR}/${AUDITLOGDATE}_$1.xml.gz

#####################################################################
## Get Database Endpoint Name
#####################################################################
EPNAME=`aws rds describe-db-instances --db-instance-identifier $1 | grep -i "Address" | cut -d '"' -f4`
echo $EPNAME

####################################################################
## Get Database Name for given Instance
####################################################################

DBNAME=`aws rds describe-db-instances --db-instance-identifier $1 | grep -i "DBName" | cut -d '"' -f4`
echo $DBNAME

###################################################################
# Purge XML files from RDS Instance
##################################################################
sqlplus -s ${DBMANAGER}/${DBPASSWORD}@$EPNAME/$DBNAME <<EOF
set pages 0
set echo off
set lines 1000
set feedback off
set termout off
spool ${SCRIPTS_DIR}/purgexml.sql
select 'exec utl_file.fremove (''ADUMP'','||''''||filename||''''||');' from table(RDSADMIN.RDS_FILE_UTIL.LISTDIR('ADUMP')) where to_char(mtime,'DD-MON-YYYY') <= trunc(sysdate)-1;
spool off
@${SCRIPTS_DIR}/purgexml.sql
EOF


sqlplus -s ${DBMANAGER}/${DBPASSWORD}@$EPNAME/$DBNAME <<EOF
BEGIN
  sys.DBMS_AUDIT_MGMT.clean_audit_trail(
   audit_trail_type        => sys.DBMS_AUDIT_MGMT.AUDIT_TRAIL_XML,
   use_last_arch_timestamp => true);
END;
/

BEGIN
  sys.DBMS_AUDIT_MGMT.clean_audit_trail(
   audit_trail_type        => sys.DBMS_AUDIT_MGMT.AUDIT_TRAIL_AUD_STD,
   use_last_arch_timestamp => true);
END;
/
EOF

###################################################################
# Remove Xml file
##################################################################
rm -f ${AUDIT_DIR}purgexml.sql
exit 0
Then analyze2.py looks like this, as you see I have filtered out the names of user that I don't want to report, you may keep your own username as required.
#!/usr/bin/python
import sys
import collections

from tabulate import tabulate
try:
    import xml.etree.cElementTree as ET
except ImportError:
    import xml.etree.ElementTree as ET

results = dict()
elements_done=0
fname = sys.argv[1]
for action,elem in ET.iterparse(sys.argv[1]):
    if elem.tag == 'AuditRecord':
        if (elem.find('OS_User').tag == 'OS_User' and elem.find('OS_User').text != 'SYSTEM' and elem.find('OS_User').text != 'tomcat' and elem.find('OS_User').text != 'dsadm' and elem.find('OS_User').text != 'rdsdb' and elem.find('OS_User').text != 'rdshm' and elem.find('OS_User').text != 'pscs' and elem.find('OS_User').text != 'dbmanager' and elem.find('OS_User').text != 'root'):
            if elem.find('OS_User') != None:
                osuser = elem.find('OS_User').text
            else:
                osuser = 'Unknown'
            if elem.find('Object_Name') != None:
                obj = elem.find('Object_Name').text
            else:
                obj = 'Unknown'
            if elem.find('DB_User') != None:
                usr = elem.find('DB_User').text
            else:
                usr = 'Unknown'
            key=osuser + obj + usr
            if not key in results:
                results[key] = {'name': osuser, 'object': obj,'dbuser': usr, 'updcnt':0, 'delcnt':0, 'altcnt':0, 'inscnt':0, 'grtcnt':0, 'drpcnt':0, 'trcnt':0}
            record = results[key]
            if ((elem.find('SesActions') != None and elem.find('SesActions').tag  == 'SesActions' and elem.find('SesActions').text == 'S---------------') or (elem.find('Action') != None and elem.find('Action').tag  == 'Action' and  elem.find('Action').text == '15')):
                oname = elem.find('Object_Name').text
                record['altcnt']  += 1
            if ((elem.find('SesActions') != None and elem.find('SesActions').tag  == 'SesActions' and elem.find('SesActions').text == '---S------------') or (elem.find('Action') != None and elem.find('Action').tag  == 'Action' and  elem.find('Action').text == '7')):
                oname = elem.find('Object_Name').text
                record['delcnt']  += 1
            if ((elem.find('SesActions') != None and elem.find('SesActions').tag  == 'SesActions' and elem.find('SesActions').text == '----------S-----') or (elem.find('Action') != None and elem.find('Action').tag  == 'Action' and  elem.find('Action').text == '6')):
                oname = elem.find('Object_Name').text
                record['updcnt']  += 1
            if ((elem.find('SesActions') != None and elem.find('SesActions').tag  == 'SesActions' and elem.find('SesActions').text == '------S---------') or (elem.find('Action') != None and elem.find('Action').tag  == 'Action' and  elem.find('Action').text == '2')):
                oname = elem.find('Object_Name').text
                record['inscnt']  += 1
            if elem.find('Action') != None and elem.find('Action').tag  == 'Action' and  elem.find('Action').text == '17':
                oname = elem.find('Object_Name').text
                record['grtcnt']  += 1
            if elem.find('Action') != None and elem.find('Action').tag  == 'Action' and  elem.find('Action').text == '12':
                oname = elem.find('Object_Name').text
                record['drpcnt']  += 1
            if elem.find('Action') != None and elem.find('Action').tag  == 'Action' and  elem.find('Action').text == '85':
                oname = elem.find('Object_Name').text
                record['trcnt']  += 1

            elements_done += 1

header_row = '''
User           \tSchema Name                    \tObject                \tINSERTS\tDELETES\tUPDATES\tALTER  \tGRANTS \tDROPS \tTRUNCATE
-------------- \t-------------------------------\t-----------------------       \t-------\t-------\t-------\t-------\t-------\t-------\t--------'''
output_line = '%-15.15s\t%-30.30s\t%-30.30s\t%7d\t%7d\t%7d\t%7d\t%7d\t%7d\t%7d'
current_user = ''
row_count = 0
page_size = 100
for key in collections.OrderedDict(sorted(results.items())):
    record = results[key]
    if current_user != record['name']:
        name = record['name']
        current_user = record['name']
    if (row_count % page_size) == 0:
        name = record['name']
        print
        print header_row
    print output_line%(name, record['dbuser'], record['object'], record['inscnt'], record['delcnt'], record['updcnt'], record['altcnt'], record['grtcnt'], record['drpcnt'], record['trcnt'])
    row_count += 1
    name=''
And then crontab your script, this way
## Oracle Audit Logs Download and Copy to S3 Bucket and give instance name and num of days
00 07 * * * sh /scripts/db_reconfiguration/audit/Download_Audit_Files.sh rdsinstancename 1
My Next Presentation in APACOUC Webinar Tour - Building a Datalake - registration link is now open.If any one interested, please register at below link.
August 18, 2017 - 19:00 AEST (3PM IST) - Suresh Gandhi presenting: Building a DataLake - More info or register Here
Today it's another script, we have got piles of EBS snapshots (around 50,000) over period of 2 years.To give a bit background the EBS volume snapshots will be taken every 4 hours along with our rds snapshots to maintain the recover-ability for some of the lob objects. So each volume having 6 per day and we have around 7 volumes of same kind.
So it's time to cleanup them. Rather deleting every snapshot or by retention of particular days snapshots, we want to retain one per day (which was the last one of the day) and delete the rest of snapshots for each EBS Volume.
And here is the script: (Note we have Description of Volume filtered, you can use Tag or Name of Snapshot Instead, Use wildcharacter * if you want so)
#!/usr/bin/env python

import boto.ec2, os
import datetime
from itertools import groupby
from operator import itemgetter
import time

MAX_SNAPSHOTS = 1   # Number of snapshots to keep

# Connect to EC2 in this region
connection = boto.ec2.connect_to_region('ap-southeast-2')

# Get a list of all volumes which having description filtered
snapshots = connection.get_all_snapshots(filters={'description':'*Production WINFS /dev/xvdk shared storage snapshot*'})
# Get a list of all volumes named *winfs-/dev/xvdk*
#snapshots = connection.get_all_snapshots(filters={'Name':'*winfs-/dev/xvdk*'})
snap_sort = sorted([(s.id, datetime.datetime.strptime(s.start_time, '%Y-%m-%dT%H:%M:%S.%fZ').date()) for s in snapshots], key=lambda k: k[1])
snaps = len(snap_sort)
for i in range(0,snaps):
    s = snap_sort[i]
    print "Checking snapshot", s[0], s[1]
    if i < snaps-1 and s[1] == snap_sort[i+1][1]:
        print "Delete snapshot", s[0], s[1]
        connection.delete_snapshot(s[0])
    time.sleep(1)
Run as below and the output shown as, And snaps will be deleted.
Well, many of you may already have this, but most of you have deployed this kind of script with lambda with a list of instances as input.
However, in my case the instances changes at least weekly as we build and terminate every two weeks and instances list is not constant, so with instances list in lambda we have to change that frequently.
So to have flexibility , while building we provide a tag ('AutoOff=True') to our RDS instance so our lambda or cronjob will pick up the rds database and stop according to schedule. If we do not want the database to be shut down we simply remove the tag.
Pre-Requisite:- Use the stable version of boto and botocore which contains the rds stop/start modules
And here is the script, which takes input of start, stop,status , if you provide an instance name the second argument will be start/stop/status
rdsmanage.py

import boto3
import logging
import sys
import os
import boto3
rds_client = boto3.client('rds')

db_instance_info = rds_client.describe_db_instances()

for each_db in db_instance_info['DBInstances']:
    response = rds_client.list_tags_for_resource(ResourceName=each_db['DBInstanceArn'])

    taglist = response['TagList']
    if sys.argv[1] == each_db['DBInstanceIdentifier'] and sys.argv[2] == 'stop':
     for tag in taglist:
        if tag['Key'] == 'AutoOff' and tag['Value'] == 'True' and each_db['DBInstanceStatus'] == 'available':
              db=each_db['DBInstanceIdentifier']
              status=each_db['DBInstanceStatus']
              print db +':'+ status
              response = rds_client.stop_db_instance(DBInstanceIdentifier=db)

    elif sys.argv[1] == each_db['DBInstanceIdentifier'] and sys.argv[2] == 'start':
     for tag in taglist:
        if tag['Key'] == 'AutoOff' and tag['Value'] == 'True' and each_db['DBInstanceStatus'] == 'available':
              db=each_db['DBInstanceIdentifier']
              status=each_db['DBInstanceStatus']
              print db +':'+ status
              response = rds_client.start_db_instance(DBInstanceIdentifier=db)

    elif sys.argv[1] == each_db['DBInstanceIdentifier'] and sys.argv[2] == 'status':
     for tag in taglist:
        if tag['Key'] == 'AutoOff' and tag['Value'] == 'True':
              db=each_db['DBInstanceIdentifier']
              status=each_db['DBInstanceStatus']
              print db +':'+ status

    elif sys.argv[1] == 'stop' and sys.argv[:2]:
     for tag in taglist:
        if tag['Key'] == 'AutoOff' and tag['Value'] == 'True' and each_db['DBInstanceStatus'] == 'available':
              db=each_db['DBInstanceIdentifier']
              status=each_db['DBInstanceStatus']
              print db +':'+ status
              response = rds_client.stop_db_instance(DBInstanceIdentifier=db)

    elif sys.argv[1] == 'start' and sys.argv[:2]:
     for tag in taglist:
        if tag['Key'] == 'AutoOff' and tag['Value'] == 'True' and each_db['DBInstanceStatus'] == 'stopped':
              db=each_db['DBInstanceIdentifier']
              status=each_db['DBInstanceStatus']
              print db +':'+ status
              response = rds_client.start_db_instance(DBInstanceIdentifier=db)

    elif sys.argv[1] == 'status' and sys.argv[:2]:
     for tag in taglist:
        if tag['Key'] == 'AutoOff' and tag['Value'] == 'True':
              db=each_db['DBInstanceIdentifier']
              status=each_db['DBInstanceStatus']
              print db +':'+ status
Hope you might have already gone through below, just in case if not. All of our developer tools/ETL tools datastage/Informatica etc. are failing with ora-28040 once we upgraded to oracle 12c.
This is due to, As per Oracle, In Oracle 12.1 the default value for the SQLNET.ALLOWED_LOGON_VERSION parameter has been updated to 11. This means that database clients using pre-11g JDBC thin drivers cannot authenticate to 12.1 database servers unless the SQLNET.ALLOWED_LOGON_VERSION parameter is set to the old default of 8.
Change/add the SQLNET.ALLOWED_LOGON_VERSION=8 in sqlnet.ora
Note: For the databases on AWS RDS this still works.
The Second wave of APACOUC - IAOUG ANZ Webinars registrations open now and you have more exciting presentations to come.
And I am presenting topic Devops for Databases which details about Devops Principles to databases, why they are hard to implement, creating your own framework, strategy, approach, tools that needed for each approach etc.
July 28, 2017 - 19:00 AEST - Suresh Gandhi presenting: DevOps for Databases - More info or register Here
Registration links:-
July 17, 2017 - 17:00 AEST - Gurcan Orhan presenting: Migration steps from OWB to ODI - More info or register Here
July 19, 2017 - 10:00 AEST - Dan McGhan presenting: Techniques for Taming the Asynchronous Nature of Node.js - More info or register Here
July 19, 2017 - 19:00 AEST - Steven Feuerstein presenting: Change Impact Analysis with 12.2 PL/Scope - More info or register Here
July 21, 2017 - 10:00 AEST - Lino Schildenfeld presenting: Thinking of going APEX 5.1? - our experience - More info or register Here
July 24, 2017 - 10:00 AEST - Satyendra Pasalapudi presenting: Running Highly Available E Business Suite on Oracle Bare Metal Cloud Service - More info or register Here
July 24, 2017 - 17:00 AEST - Heli Helskyaho presenting: Top 10 Features of Oracle SQL Developer everybody should use, even in the Cloud - More info or register Here
July 26, 2017 - 10:00 AEST - Tim Gorman presenting: Accelerating Development and Testing Using Data Virtualization - More info or register Here
July 26, 2017 - 19:00 AEST - Biju Thomas presenting: Do I have to learn new tricks to manage Oracle database in the Cloud? - More info or register Here
July 28, 2017 - 10:00 AEST - Kai Yu presenting: Get ready to upgrade your Oracle databases to 12cR2: tools, methods and paths - More info or register Here
July 28, 2017 - 19:00 AEST - Suresh Gandhi presenting: DevOps for Databases - More info or register Here
July 31, 2017 - 10:00 AEST - Charles Kim presenting: Backup to the Cloud and Beyond - More info or register Here
August 2, 2017 - 10:00 AEST - Dan McGhan presenting: Building Real-time Data in Web Applications with Node.js - More info or register Here
August 2, 2017 - 19:00 AEST - Joel Perez presenting: RMAN one of the best tools to move on-premise databases to the Cloud - More info or register Here
August 4, 2017 - 10:00 AEST - Daniel Morgan presenting: Oracle Database 12.2 Application Containers - More info or register Here
August 4, 2017 - 17:00 AEST - Gurcan Orhan presenting: EDQ, OGG and ODI over Exadata in the Cloud for Perfection - More info or register Here
August 7, 2017 - 10:00 AEST - Tim Gorman presenting: Securing Data Using Data Obfuscation - More info or register Here
August 7, 2017 - 17:00 AEST - Heli Helskyaho presenting: Introduction to the Big Data World - More info or register Here
August 7, 2017 - 19:00 AEST - Francisco M Alvarez presenting: Logging or NoLogging:That's the question - More info or register Here

Follow Me!!!