Written by Akhil Mathema,
We recently incorporated IPSec Tunnel and Transit VPC for our project to simplify our Network connectivity between different AWS Accounts and different VPC's.
AWS provides a great flexibility of architecturing your network infrastructure either in terms of Security, flexibility and simplicity.
Whether it is from Security or Infrastructure architect perspective, it is ideal to have lesser public facing endpoints in the cloud. An ideal scenario would be to have all non-production resources are to be accessible only via Corporate network. However, it could be challenging if there are multiple non-production environments such as Integration, Configuration, Development, Test, Staging, User-Acceptance Test and so on.
The most common practice would be to setup a multiple Direct Connects or VPN connections to various VPCs. This would be less economical and multiple external routes from the corporate network. This can be overcome by the usage of the concept of Transit VPC in conjunction of IPSec tunnel.
Take a reference as if you have requirement of setting up a site-to-site VPN between a main and branch office. The end objective would be site office being able to reach file server in local network of main office.
The concept of Transit VPC is like all traffic from the corporate network would route to this VPC through a Direct Connect. This would further peer to non-production VPCs. An EC2 instance can be launched in the private subnet of the Transit VPC with IPSec Tunnel configured. On the other hand, either a physical or VM can would be configured with IPSec Tunnel which eventually establishes an IPSec Tunnel over Direct Connect.
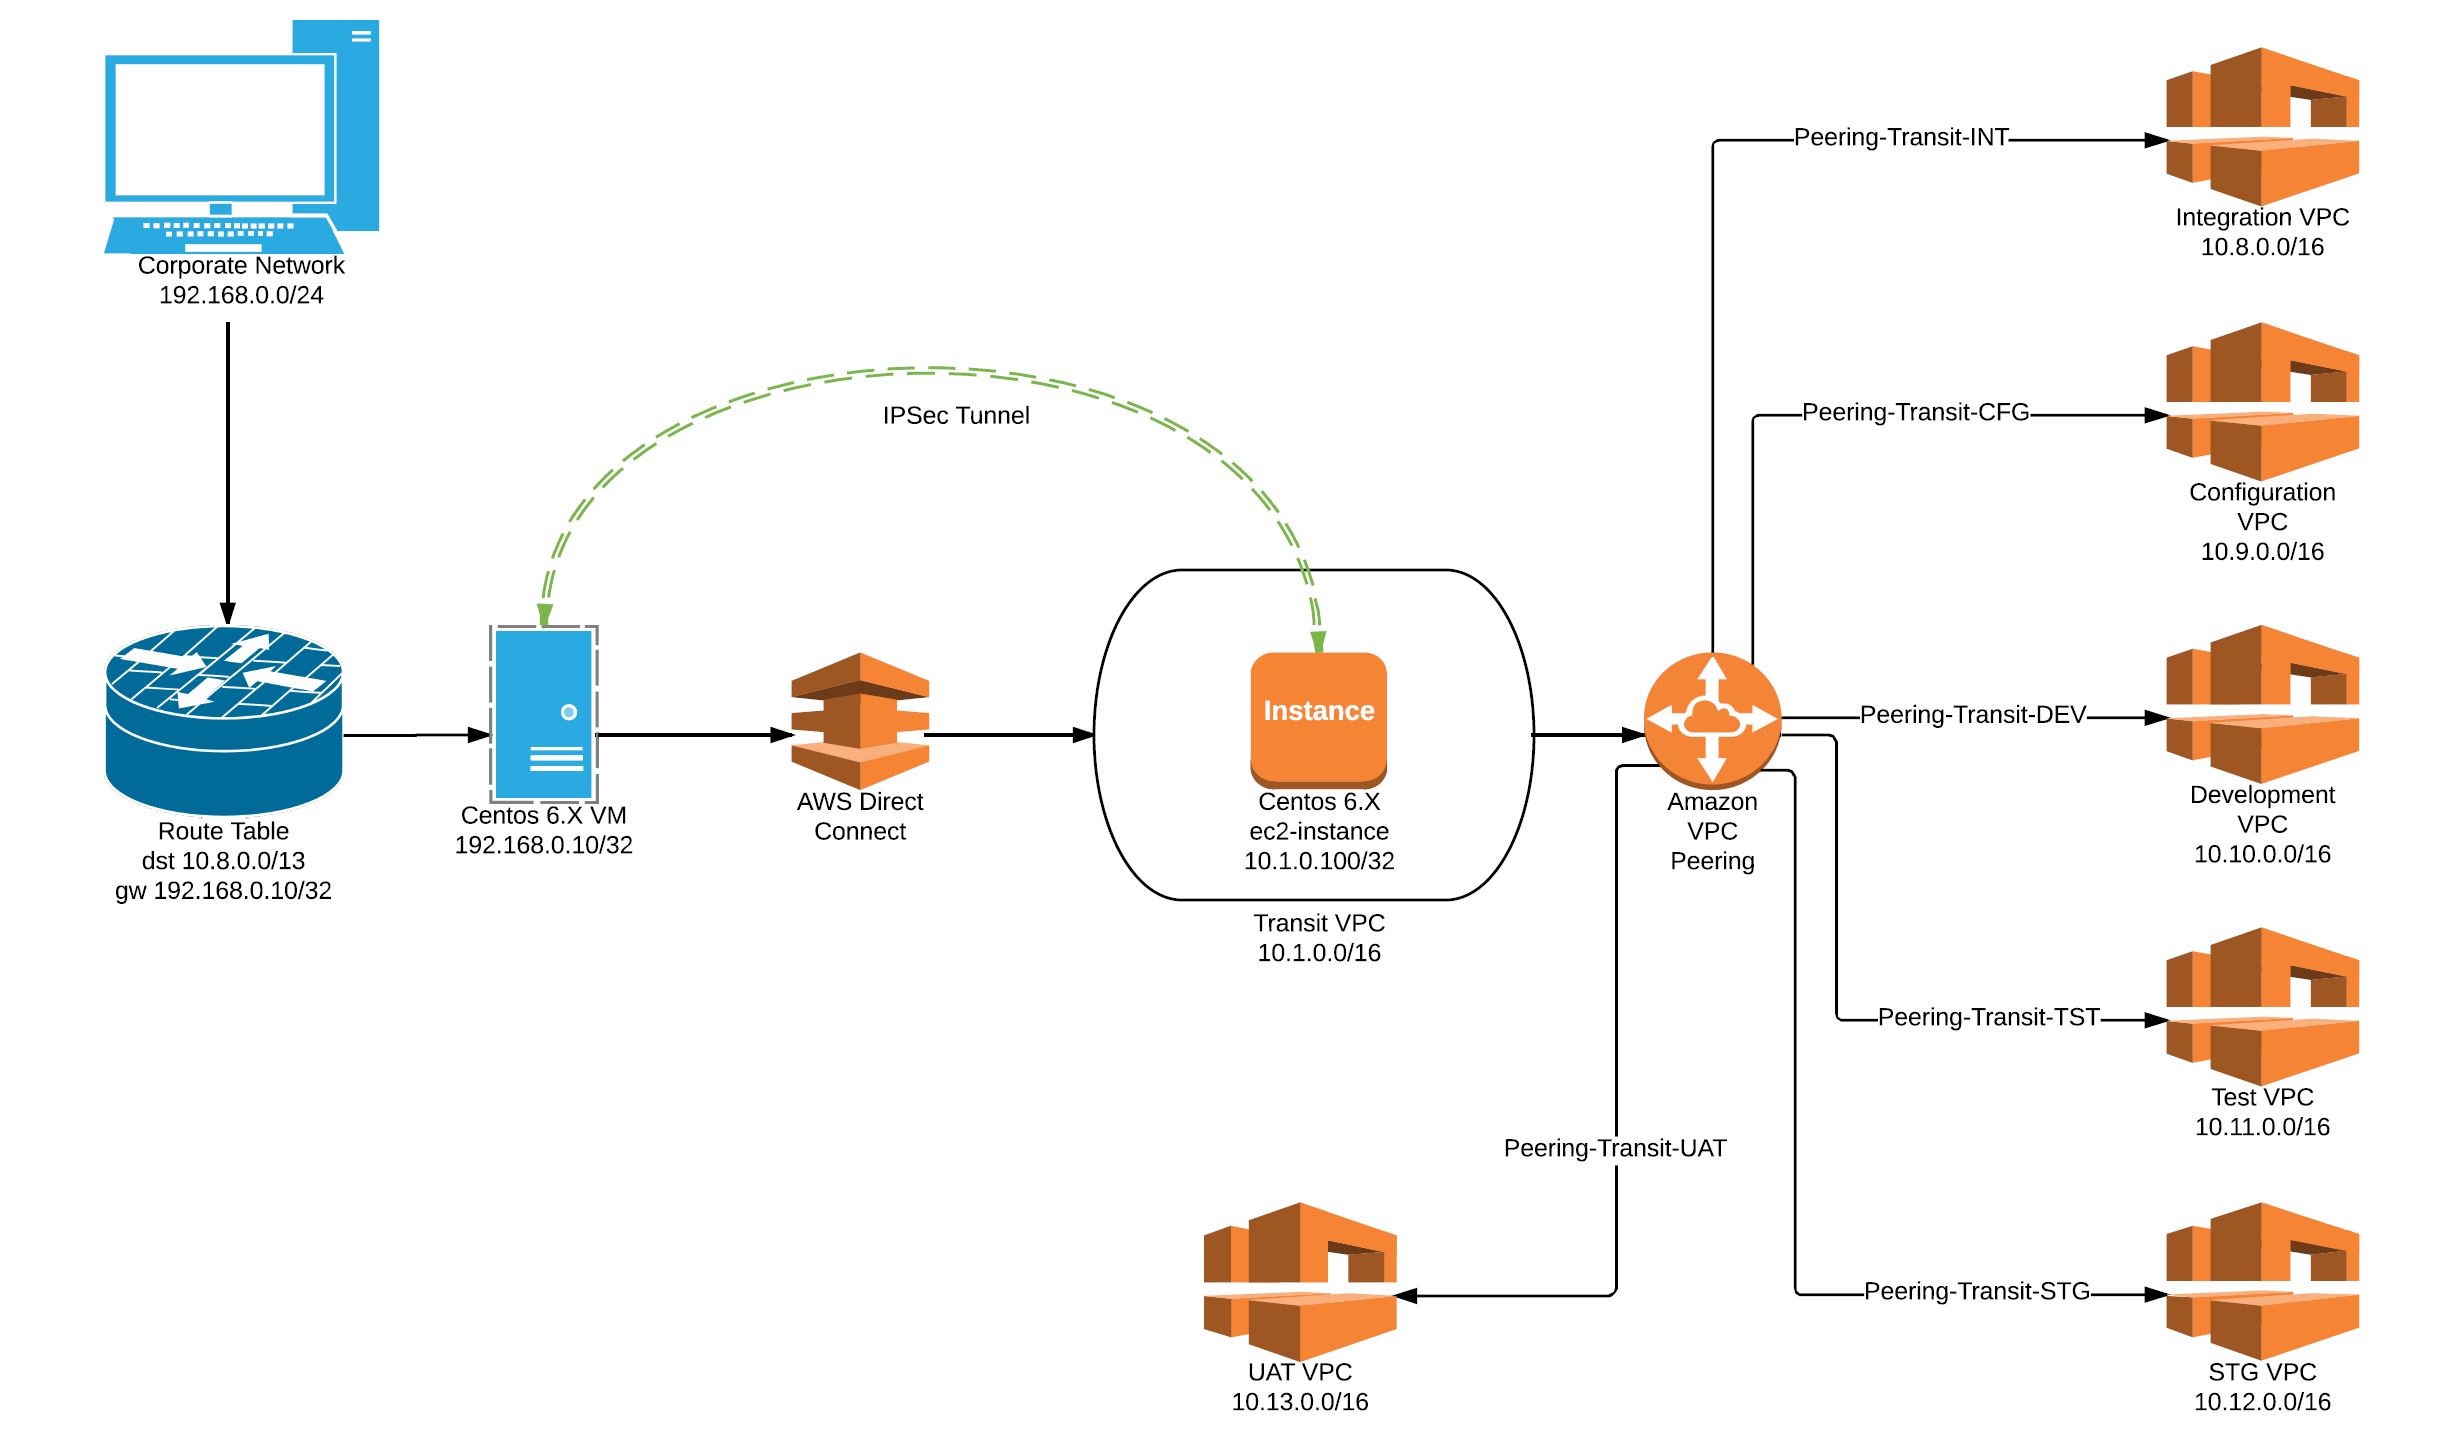
I will present a scenario with the following resources:
- Corporate network: 192.168.0.0/24
- Transit VPC: 10.1.0.0/16
- Linux VM (Centos 6.X) in corporate network: 192.168.0.10
- Linux Ec2 instance in Transit VPC: 10.1.0.100
- Integration VPC: 10.8.0.0/16
- Configuration VPC: 10.9.0.0/16
- Development VPC: 10.10.0.0/16
- Test VPC: 10.11.0.0/16
- Staging VPC: 10.12.0.0/16
- UAT VPC: 10.13.0.0/16
- Openswan tool to setup IPSec tunnel
Here is how it can be configured:
Step 1: Establish Direct Connect
Ensure you have Direct Connect establish between your corporate network and a transit VPC. This means any resource on Transit VPC are routable via Direct Connect. In this case, test the network connectivity from 192.168.0.0/24 to 10.1.0.0/16
Step 2: VPC peering
You can peer VPC as follows:
Peering connection name tag: Peering-Transit-DEV
VPC (Requester): vpc-id of Transit VPC 10.1.0.0/16
VPC (Accepter): vpc-id of Development VPC 10.10.0.0/16
Once created Peering Connection, you need to “Accept Request” for the peering.
Repeat the same process for the rest of the VPCs (Integration, Configuration, Test, Staging and UAT)
For example:
| Peering Connection | Peering ID |
| Peering-Transit-INT | pcx-abcd1234 |
| Peering-Transit-CFG | pcx-abcd5678 |
| Peering-Transit-DEV | pcx-cdef1234 |
| Peering-Transit-TST | pcx-cdef5678 |
| Peering-Transit-STG | pcx-fedc0987 |
| Peering-Transit-UAT | pcx-fedc7890 |
Step 3: Configure IPSec Tunnel
Using an Open Source tool OpenSwan, you can configure a IPSec Tunnel between a VM in corporate network and an ec2-instance in Transit VPC. In this example, I have used Pre-shared key. The following are the primary configs:
$cat /etc/ipsec.d/awsvpc.conf
              conn awsvpc
            type=tunnel
             authby=secret
            mtu=1436
            keyingtries=3
            left=192.168.0.10
            leftsubnets={192.168.0.0/24}
            leftnexthop=%defaultroute
            right=10.1.0.100
            rightsubnets={10.8.0.0/13}
            rightnexthop=%defaultroute
            auto=start
$cat /etc/ipse.d/ipsec.secrets
             %any %any : PSK "*********************"
$ cat /etc/ipsec.conf
             config setup
            nat_traversal=yes
            virtual_private=%v4:10.92.168.0.0/24,%v4:10.8.0.0/13
              include /etc/ipsec.d/*.conf

Please note: 10.8.0.0/13 would cover the range from 10.8.0.0 to 10.15.255.255
Step 4: Update Static route for non-prod VPCs:
All traffic to non-prod VPCs will traverse through an on-prem VM.
Hence a static route needs to be configured at the corporate router as follows:
| Source | Destination | Gateway |
| 192.168.0.0/24 | 10.8.0.0/13 | 192.168.0.10/32 |
This means any traffic from corporate network 192.168.0.0/24 with destination to 10.8.0.0/16, 10.9.0.0/16, 10.10.0.0/16, 10.11.0.0/16, 10.12.0.0/16 and 10.13.0.0/16 will be routed through a VM 192.168.0.10.
Step 5: Configure Route Table:
For the given subnet inside Transit VPC, create a route table as follows:
| Destination | Target |
| 10.1.0.0/16 | local |
| 10.8.0.0/16 | pcx-abcd1234 |
| 10.9.0.0/16 | pcx-abcd5678 |
| 10.10.0.0/16 | pcx-cdef1234 |
| 10.11.0.0/16 | pcx-cdef5678 |
| 10.12.0.0/16 | pcx-fedc0987 |
| 10.13.0.0/16 | pcx-fedc7890 |
For the given subnet inside Development VPC, create route table as follows:
| Destination | Target |
| 10.1.0.0/16 | pcx-cdef1234 |
Repeat same process for rest of the VPC in INT, CFG, TST, STG and UAT.
Step 6: Configure Security Groups:
Finally, configure Security Groups for each subnet required to be accessible from the corporate network.
| Type | Protocol | Port Range | Source | |
| HTTP | TCP | 80 | Custom | 192.168.0.0/24 |
| SSH | TCP | 22 | Custom | 192.168.0.0/24 |
| All-ICMPv4 | ICMP | 0-65535 | Custom | 192.168.0.0/24 |
| RDP | TCP | 3389 | Custom |
192.168.0.0/24 |
On completion of all six steps, you should be able to access AWS resources in non-production VPCs as per defined in Security Groups.
Hope you like this post.
-Akhil Mathema
Follow Me!!!