Disclaimer All information is offered in good faith and in the hope that it may be of use for educational purpose and for Database community purpose, but is not guaranteed to be correct, up to date or suitable for any particular purpose. db.geeksinsight.com accepts no liability in respect of this information or its use.
This site is independent of and does not represent Oracle Corporation in any way. Oracle does not officially sponsor, approve, or endorse this site or its content and if notify any such I am happy to remove.
Product and company names mentioned in this website may be the trademarks of their respective owners and published here for informational purpose only.
This is my personal blog. The views expressed on these pages are mine and learnt from other blogs and bloggers and to enhance and support the DBA community and this web blog does not represent the thoughts, intentions, plans or strategies of my current employer nor the Oracle and its affiliates or any other companies. And this website does not offer or take profit for providing these content and this is purely non-profit and for educational purpose only.
If you see any issues with Content and copy write issues, I am happy to remove if you notify me.
Contact Geek DBA Team, via geeksinsights@gmail.com
|
We all know that Oracle has a statistics to calculate the Oracle usage of CPU with "v$sysstat.name=’CPU used by this session’"
But this statistic value got a problem, since the value will not be accounted/cumulated until the call on the cpu completed, For example, for a PL/SQL program if it takes one hour to complete the call, until that one hour the cpu usage will show zero only.
Rather, using ASH and some other metrics will give you the accurate usage of CPU by Oracle, by OS, CPU Demand.
So lets find out what are the metrics that are useful
1.Oracle CPU used
2.System CPU used
3.Oracle demand for CPU
col metric_name for a25
col metric_unit for a25
select metric_name, value, metric_unit from v$sysmetric where metric_name like'%CPU%' where group_id=2;
METRIC_NAME                         VALUE METRIC_UNIT
------------------------------ ---------- ------------------------------
CPU Usage Per Sec              251.067016 CentiSeconds Per Second
CPU Usage Per Txn              5025.52477 CentiSeconds Per Txn
Host CPU Utilization (%)       11.6985845 % Busy/(Idle+Busy)
Database CPU Time Ratio        76.3291033 % Cpu/DB_Time
Converting them to into an useful meaningful numbers, gives accurate picture of the CPU usage by Oracle or by OS or how much oracle is waiting for CPU.
A script from Kyle Hailey's blog, very very useful, thanks to him.
Download Script from here:- Oracle_CPU
Output,
SQL> /

 CPU_TOTAL     CPU_OS    CPU_ORA CPU_ORA_WAIT     COMMIT     READIO       WAIT
---------- ---------- ---------- ------------ ---------- ---------- ----------
     4.247       .727      2.807         .713          0      1.049       .019

SQL>
Here my database is having 24 cpu cores and using 4.247 core usage in total,
Out of that,
.727 burning for OS
2.807 consumed by Oracle
.713 running on CPU
0 for commit processing
1.049 for USER I/O processing
0.19 is other wait
Hope this helps in understanding the CPU Usage by oracle and whether and where the CPU used in the databases. This also provides a clue on how much the cpu utilized on the total count of the CPU in the server per database. Ofcourse you should run this script every hour and store the details in a table to picturise the same.
-Thanks
Geek DBA
Hello,
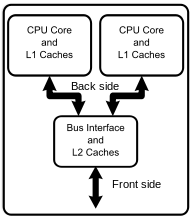
A multi-core processor is a single computing component with two or more independent actual central processing units (called "cores"), which are the units that read and execute program instructions.[1] The instructions are ordinary CPU instructions such as add, move data, and branch, but the multiple cores can run multiple instructions at the same time, increasing overall speed for programs amenable to parallel computing.
A dual-core processor has two cores (e.g. AMD Phenom II X2, Intel Core Duo), a quad-core processor contains four cores (e.g. AMD Phenom II X4, Intel's quad-core processors, see i3, i5, and i7 at Intel Core), a hexa-core processor contains six cores (e.g. AMD Phenom II X6, Intel Core i7 Extreme Edition 980X), an octa-core processor contains eight cores (e.g. Intel Xeon E7-2820, AMD FX-8150). A multi-core processor implements multiprocessing in a single physical package. Designers may couple cores in a multi-core device tightly or loosely. For example, cores may or may not share caches, and they may implement message passing or shared memory inter-core communication methods
A diagram that depicts the CPU and its cores for a dual core processor.
Now, For example how to find the Physical CPU, Cores, Virtual CPU's in a Linux
Find the Physical CPU's
[oracle@XXXXXXXXXX]/home/oracle # cat /proc/cpuinfo | grep "physical id" | sort | uniq | wc -l
8
Find the Cores per each CPU
[oracle@XXXXXXXXXX]/home/oracle # cat /proc/cpuinfo | grep "cpu cores" | uniq
cpu cores : 4
Find the number of virtual processor in total in Server
[oracle@XXXXXXXXXX]//home/oracle # cat /proc/cpuinfo | grep "^processor"
processor : 0
processor : 1
processor : 2
processor : 3
processor : 4
processor : 5
processor : 6
processor : 7
processor : 8
processor : 9
processor : 10
processor : 11
processor : 12
processor : 13
processor : 14
processor : 15
processor : 16
processor : 17
processor : 18
processor : 19
processor : 20
processor : 21
processor : 22
processor : 23
processor : 24
processor : 25
processor : 26
processor : 27
processor : 28
processor : 29
processor : 30
processor : 31
Identify the model of your processor, i.e quad core, dual core etc.
[oracle@XXXXXXXXX]/home/oracle # cat /proc/cpuinfo | grep model
model : 4
model name : Quad-Core AMD Opteron(tm) Processor 8384
I have a quad core processor, So my server has
8 (physical CPU) * 4 core each per CPU = 32 vCPU.
This 32 cpu will show in your cpu_count
SQL> show parameter cpu_count
NAME TYPE VALUE
------------------------------------ -------------------------------- ------------------------------
cpu_count integer 32
SQL>
In Solaris the above can be gathered a bit different way, Download Solaris_CPUCount">Script Here
Output
Total number of physical processors: 4
Number of virtual processors: 32
Total number of cores: 16
Number of cores per physical processor: 4
Number of hardware threads (strands or vCPUs) per core: 2
Processor speed: 2660 MHz (2.66 GHz)
** Socket-Core-vCPU mapping **
Physical Processor 1 (chip id: 1024):
Core 1 (core id: 0):
vCPU ids: 0 - 1
Core 2 (core id: 2):
vCPU ids: 2 - 3
Core 3 (core id: 4):
vCPU ids: 4 - 5
Core 4 (core id: 6):
vCPU ids: 6 - 7
Physical Processor 2 (chip id: 1032):
Core 1 (core id: 8):
vCPU ids: 8 - 9
Core 2 (core id: 10):
vCPU ids: 10 - 11
Core 3 (core id: 12):
vCPU ids: 12 - 13
Core 4 (core id: 14):
vCPU ids: 14 - 15
Physical Processor 3 (chip id: 1040):
Core 1 (core id: 16):
vCPU ids: 16 - 17
Core 2 (core id: 18):
vCPU ids: 18 - 19
Core 3 (core id: 20):
vCPU ids: 20 - 21
Core 4 (core id: 22):
vCPU ids: 22 - 23
Physical Processor 4 (chip id: 1048):
Core 1 (core id: 24):
vCPU ids: 24 - 25
Core 2 (core id: 26):
vCPU ids: 26 - 27
Core 3 (core id: 28):
vCPU ids: 28 - 29
Core 4 (core id: 30):
vCPU ids: 30 - 31
-Thanks
Geek DBA
Normally, archived redo log files in a flash recovery area that were backed up to a tertiary device or made obsolete (as defined by the RMAN retention policy) are eligible for deletion.
The archived redo log files that are backed up or obsolete can eventually be deleted automatically to make space if the disk space in the flash recovery area becomes full.
However, you can change this default deletion policy using the following
RMAN command:CONFIGURE ARCHIVELOG DELETION POLICY TO [CLEAR | NONE | APPLIED ON STANDBY];
This will be especially useful when you have bunch of archivelogs and you are unable to deterime which archives applied or not, Further, there will be cases when you have manually recovered the archive logs using recover standby rather managed recovery and the v$archived_log applied column will be marked as "NO"
APPLIED ON STANDBY:-

CLEAR Clause
Use the CLEAR clause to disable the deletion policy that was previously set up with the RMAN CONFIGURE ARCHIVELOG DELETION POLICY command. The Oracle database will resume the default deletion policy behavior, which is to delete archived redo log files that are backed up or obsolete to make space if disk space in the flash recovery area becomes full.
Using the NONE Clause
Use the NONE clause so that archived redo logs in flash recovery area that were backed up or obsolete as per the RMAN retention policy are eligible for deletion. This is the default configuration. Archived redo log files that are backed up or obsolete are deleted to make space if the disk space in the flash recovery area becomes full.
Examples of the CONFIGURE ARCHIVELOG DELETION POLICY Command
When backups of archived redo log files are taken on the standby database:
-
Issue the following command on the primary database:
CONFIGURE ARCHIVELOG DELETION POLICY TO APPLIED ON STANDBY;
-
Issue the following command on the standby database:
CONFIGURE ARCHIVELOG DELETION POLICY TO NONE;
When backups of archived redo log files are taken on the primary database:
-
Issue the following command on the standby database:
CONFIGURE ARCHIVELOG DELETION POLICY TO APPLIED ON STANDBY;
-
Issue the following command on the primary database:
CONFIGURE ARCHIVELOG DELETION POLICY TO NONE;
Regards
Geek DBA
A note on tracing when you have dataguard environment,
Use the following useful SQL
- SELECT group#, member FROM v$logfile WHERE type = 'STANDBY';
- SELECT group#, dbid, archived, status FROM v$standby_log;
- SELECT dest_id,valid_type,valid_role,valid_now FROM v$archive_dest;
- SELECT process, status, group#, thread#, sequence# FROM v$managed_standby order by process, group#, thread#, sequence#;
- SELECT name, value, time_computed FROM v$dataguard_stats;
- SELECT timestamp, facility, dest_id, message_num, error_code, message FROM v$dataguard_status ORDER by timestamp;
- SELECT primary_xid, type, mining_status, apply_status FROM v$logstdby_transaction;
Use LOG_ARCHIVE_TRACE for tracing various redo propagation and apply processes/tasks
- ALTER SYSTEM SET LOG_ARCHIVE_TRACE=<trace level>
The trace level can be as follows
- 0 Disables archived redo log tracing (default setting)
- 1 Tracks archiving of redo log file
- 2 Tracks archival status per archived redo log destination
- 4 Tracks archival operational phase
- 8 Tracks archived redo log destination activity
- 16 Tracks detailed archived redo log destination activity
- 32 Tracks archived redo log destination parameter modifications
- 64 Tracks ARCn process state activity
- 128 Tracks FAL server process activity
- 256 Reserved for future use
- 512 Tracks asynchronous LGWR activity
- 1024 Tracks RFS physical client
- 2048 Tracks ARCn or RFS heartbeat
- 4096 Tracks real-time apply activity
- 8192 Tracks Redo Apply activity (media recovery or physical standby)
If you configured DG broker the trace can be enabled as follows and the files located as.
Trace files for DMON can be found in the bdump directory and is called drc<sid>.log
/** Tracing primary site **/
DGMGRL> edit database 'primary_db_name' set property LogArchiveTrace='1′;
/** Tracing standby site **/
DGMGRL> edit database 'standby_db_name' set property LogArchiveTrace='1′;
/** Directly from the dgmgrl command prompt **/
host#> dgmgrl -debug sys/password@<instance>
Enterprise manage can be used to monitor, manage and trigger alerts for DG configurations
Use the following commands from within DGMGRL
- SHOW DATABASE <'db name'> 'StatusReport'
- SHOW DATABASE <'db name'> 'LogXptStatus'
- SHOW DATABASE <'db name'> 'InconsistentProperties'
- SHOW DATABASE <'db name'> 'InconsistentLogXptProps'
- SHOW CONFIGURATION
- SHOW DATABASE <db name>
- debug
- logfile
Thanks
Geek DBA
Here I log, some important ASM scripts which are very useful for me as well as a ready reference for you all.
Before to scripts, here are the important views respective to ASM instances.
| View Name |
ASM Instance |
DB Instance |
| V$ASM_DISKGROUP |
Describes a disk group (number, name, size
related info, state, and redundancy type) |
Contains one row for every open ASM
disk in the DB instance. |
| V$ASM_CLIENT |
Identifies databases using disk groups
managed by the ASM instance. |
Contains no rows. |
| V$ASM_DISK |
Contains one row for every disk discovered by the ASM instance, including disks that are not part of any disk group. |
Contains rows only for disks in the
disk groups in use by that DB instance. |
| V$ASM_FILE |
Contains one row for every ASM file in every disk group mounted by the ASM instance. |
Contains rows only for files that are currently open in the DB instance. |
| V$ASM_TEMPLATE |
Contains one row for every template present in every disk group mounted by the ASM instance. |
Contains no rows. |
| V$ASM_ALIAS |
Contains one row for every alias present in every disk group mounted by the ASM instance. |
Contains no rows. |
| v$ASM_OPERATION |
Contains one row for every active ASM long running operation executing in the ASM instance., such as rebalance operation |
Contains no rows. |
| v$ASM_ATTRIBUTE |
Contains one row for every diskgroup pertaining to the disk group attribute, such as compatible asm, rdbms asm etc |
Contains no rows. |
| V$ASM_DISK_IOSTAT |
about disk I/O statistics for each ASM client |
One row if queried from the database instance that is viewed |
| V$ASM_DISK_STAT |
displays performance statistics in the same way that V$ASM_DISK does, but without performing discovery of new disks. This results in a less expensive operation |
Contains rows only for disks in the
disk groups in use by that DB instance. |
Click Below for scripts
Continue reading ASM Scripts: Automatics Storage Management Scripts
Hello,
In this post, we will look different ways of copying Files between OS and ASM.
Before to that we see what are the tools available for the same.
- XML DB - enables file transfer since Oracle 10gR1
XML DB creates a virtual folder /sys/asm and makes it accessible via ftp or http. You will see how to use XML DB features for transferring files between file system and ASM using the virtual /sys/asm folder. In order to use this feature for file transfer XML DB needs to be installed and configured
Full details available here: http://docs.oracle.com/cd/B28359_01/server.111/b31107/asmfiles.htm#BABJCCEI
- ASMCMD cp command since Oracle 11g
Starting with 11G asmcmd is further enhanced and one of the benefits is cp. ASMCMD cp command can be used to copy both locally and remotely in the following directions:
ASMCMD [+] > cp +data/orcl/datafile/TEST.267.78569634 /mybackups/example.bak
copying +data/orcl/datafile/TEST.267.78569634 -> /mybackups/example.bak
ASMCMD [+] > cp /mybackups/test.txt +data/orcl/datafile/test.txt
copying /mybackups/examples.bak -> +data/orcl/datafile/myexamples.bak
ASMCMD [+] > cp +data/orcl/datafile/TEST.267.78569634 sys@server.asminstance:/home/oracle
ASMCMD [+] > cp +data/orcl/datafile/TEST.267.78569634 sys/passwd@server.asminstance:/home/oracle
ASMCMD [+] > cp sys@server.asminstance:/home/oracle +data/orcl/datafile/file
- DBMS_FILE_TRANSFER package - allowed transfer between ASM/FS since 10gR2
DBMS_FILE_TRANSFER package is available since Oracle 10gR1 and since 10gR2 supports transferring files as follows:
- ASM->ASM
- FS->ASM
- FS->FS
- FS->ASM
Let's create a directory pointing to a file system
CREATE OR REPLACE DIRECTORY fs_dir AS '/home/oracle/stage_file';
Let's create a directory pointing to ASM
CREATE OR REPLACE DIRECTORY ASM_dir AS '+DATA/tst';
to copy example.txt file from ASM to a /home/oracle/stage_file directory.
SQL> exec dbms_file_transfer.COPY_FILE('asm_dir','example.txt','fs_dir','example.txt');
PL/SQL procedure successfully completed.
-Thanks
Geek DBA
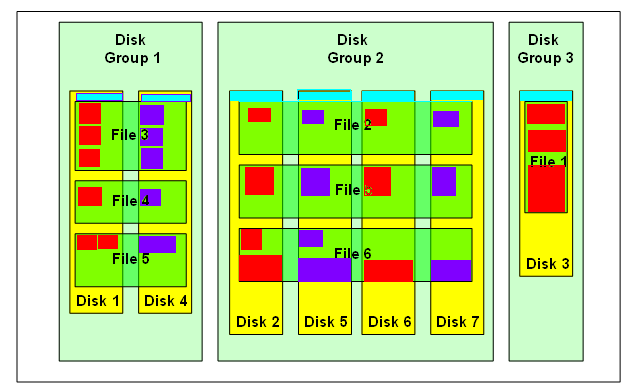
Oracle ASM uses disk groups to store data files. An ASM disk group is a collection of disks managed as a unit. Within a disk group, ASM exposes a file system interface for Oracle database files. The content of files that are stored in a disk group is evenly distributed to eliminate hot spots and to provide uniform performance across the disks. The performance is comparable to the performance of raw devices. [From Oracle® Automatic Storage Management Administrator's Guide 11g Release 2].
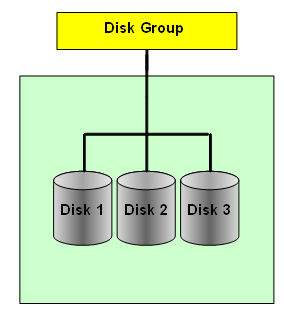
ASM Disk Groups
An ASM disk group consists of one or more disks and is the fundamental object that ASM manages. Each disk group is self contained and has its own ASM metadata. It is that ASM metadata that an ASM instance manages.
The idea with ASM is to have small number of disk groups. In ASM versions before 11.2, two disk groups should be sufficient - one for datafiles and one for backups/archive logs. In 11.2 you would want to create a separate disk group for ASM spfile, Oracle Cluster Registry (OCR) and voting disks - provided you opt to place those objects in an ASM disk group.
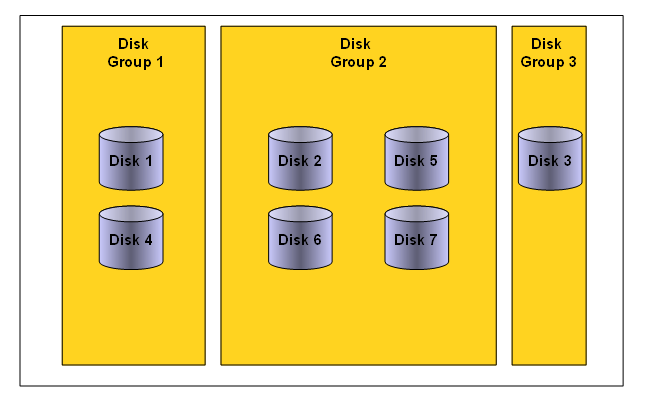
ASM Disks
Disks to be used by ASM have to be set up and provisioned by OS/storage administrator before ASM installation/setup. Disks can be local physical devices (IDE, SATA, SCSI, etc), SAN based LUNs (iSCSI, FC, FCoE, etc) or NAS/NFS based disks. Disks to be used for ASM should be partitioned. Even if the whole disk is to be used by ASM, it should have a single partition.
The above is true for all environments except for Exadata - where ASM makes use of grid disks, created from cell disks and presented to ASM via LIBCELL interface.
An ASM disk group can have up to 10,000 disks. Maximum size for an individual ASM disk is 2 TB. Due to bug 6453944, it is possible to add disks over 2 TB to an ASM disk group. The fix for bug 6453944 is in 10.2.0.4, 11.1.0.7 and 11.2. MOS Doc ID 736891.1 has more on that.
ASM looks for disks in the OS location specified by ASM_DISKSTRING initialization parameter. All platforms have the default value, so this parameter does not have to be specified. In a cluster, ASM disks can have different OS names on different nodes. In fact, ASM does not care about the OS disk names, as those are not kept in ASM metadata.
ASM Files
Any ASM file is allocated from and completely contained within a single disk group. However, a disk group might contain files belonging to several databases and a single database can have files in multiple disk groups.
ASM can store all Oracle database file types - datafiles, control files, redo logs, backup sets, data pump files, etc - but not binaries or text files. In addition to that, ASM also stores its metadata files within the disk group. ASM has its own file numbering scheme - independent of database file numbering. ASM file numbers under 256 are reserved for ASM metadata files.
ASM Cluster File System (ACFS), introduced in 11.2, extends ASM support to database and application binaries, trace and log files, and in fact any files that can be stored on a traditional file systems. And most importantly, the ACFS is a cluster file system.
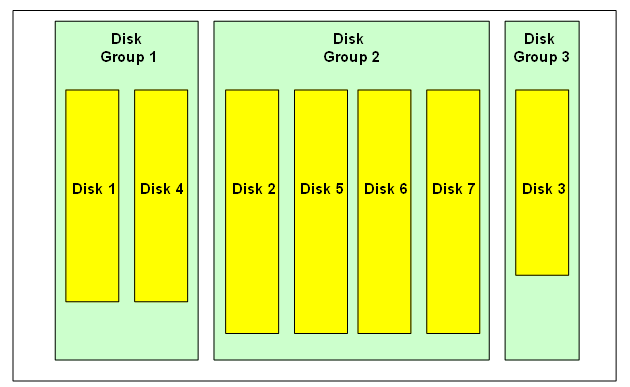
ASM Allocation Units
An ASM allocation unit (AU) is the fundamental space unit within an ASM disk group . Every ASM disk is divided into allocation units.
When a disk group is created, the allocation unit size can be set with the disk group attribute AU_SIZE (in ASM versions 11.1 and later). The AU size can be 1, 2, 4, 8, 16, 32 or 64 MB. If not explicitly set, the AU size defaults to 1 MB (4MB in Exadata).
AU size is a disk group attribute, so each disk group can have a different AU size.
ASM Extents
An ASM extent consists of one or more allocation units. An ASM file consists of one or more ASM extents.
We distinguish between physical and virtual extents. A virtual extent, or an extent set, consists of one physical extent in an external redundancy disk group, at least two physical extents in a normal redundancy disk group and at least three physical extents in a high redundancy disk group.
Before ASM version 11.1 we had uniform extent size. ASM version 11.1 introduced the variable sized extents that enable support for larger data files, reduce (ASM and database) SGA memory requirements for very large databases, and improve performance for file create and open operations. The initial extent size equals the disk group AU_SIZE and it increases by a factor of 4 or 16 at predefined thresholds. This feature is automatic for newly created and resized data files with disk group compatibility attributes COMPATIBLE.ASM and COMPATIBLE.RDBMS set to 11.1 or higher.
The extent size of a file varies as follows:
- Extent size always equals the disk group AU_SIZE for the first 20,000 extent sets
- Extent size equals 4*AU_SIZE for the next 20,000 extent sets
- Extent size equals 16*AU_SIZE for the next 20,000 and higher extent sets
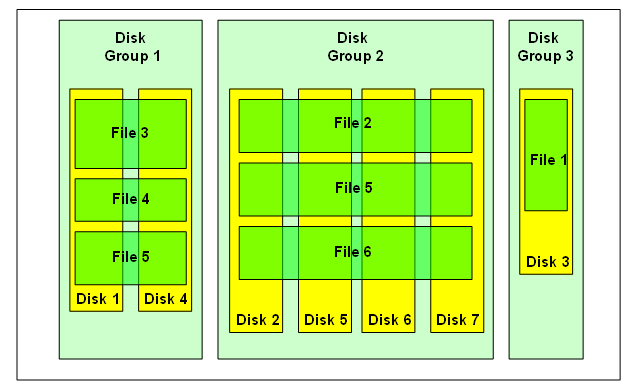
Together combined allocation unit and Extent size the distribution of extents is like somewhat below, Each extent is copied /created in each disk evenly,
Note the size of the extents may vary in the disks but in the files & Also observe the Cyan color boxes are the ASM Metadata content.
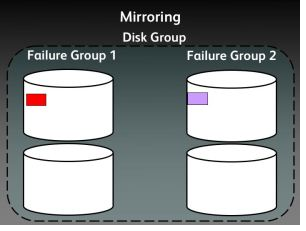
ASM Mirroring
ASM mirroring protects data integrity by storing multiple copies of the same data on different disks. When a disk group is created, ASM administrator can specify the disk group redundancy as follows:
- External - no ASM mirroring
ASM mirrors extents - it does not mirror disks or blocks. ASM file mirroring is the result of mirroring of the extents that constitute the file . In ASM we can specify the redundancy level per file. For example, one file in a normal redundancy disk group, can have its extents mirrored once (default behavior). Another file, in the same disk group, can be triple mirrored - provided there are at least three failgroups in the disk group. In fact all ASM metadata files are triple mirrored in a normal redundancy disk group - provided there are at least three failgroups.
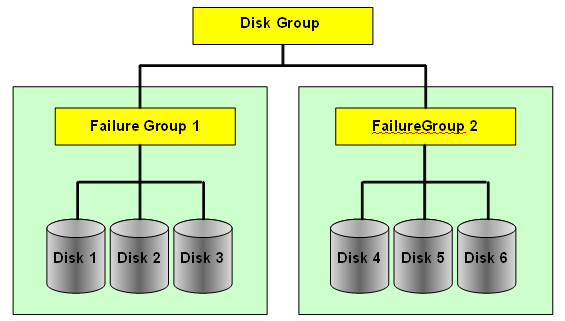
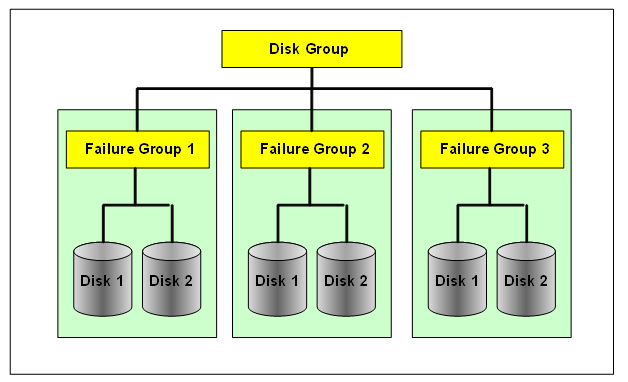
ASM Failgroups
ASM disks within a disk group are partitioned into failgroups (also referred to as failure groups or fail groups). The failgroups are defined at the time the disk group is created. If we omit the failgroup specification, then ASM automatically places each disk into its own failgroup. The only exception is Exadata, where all disks from the same storage cell are automatically placed in the same failgroup.
Normal redundancy disk groups require at least two failgroups. High redundancy disk groups require at least three failgroups. Disk groups with external redundancy do not have failgroups.
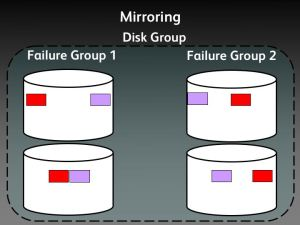
When an extent is allocated for a mirrored file, ASM allocates a primary copy and a mirror copy. Primary copy is store on one disk and the mirror copy on some other disk in a different failgroup.
When adding disks to an ASM disk group for which failgroups are manually specified, it is imperative to add the disks to the correct failgroup.
The brown colour boxes are metadata headers of the disk, each disk contain the metadata header in failuregroup containing the distribution of extents spread across in the disk
Further, The Red color boxes are the extents in failure group 1, called as primary extents and the purple ones are the secondary extents a mirrored copy of the primary extents.
In case of High redudancy the extents of secondary were two as it contains three failure groups.

Source:- Diagrams picked up from www.juliandyke.com and modified a bit
Next Post:- ASM Metadata Contents (the brown boxes above)
-Thanks
Geek DBA
Hi,
When the ASM Diskgroups are mounted and the ASM instance is up and running you can view various dynamic views such as v$asm_diskgroup, v$asm_disk, v$asm_template etc to view the disk properties.
But, When the diskgroup is not mounted, this information is not available, which makes difficult to diagnose the errors avoiding the diskgroup to be mounted. Especially in scenarious like disk header issues, This problem has been resolved with AMDU.
ASM Metadata Disk utility (AMDU) is a tool introduced in 11g where it is posible to extract all the available metadata from one or more ASM disks, generate formatted block printouts from the dump output, extract one or more files from a diskgroup (mounted/unmounted) and write them to the OS file system.
Although this tool was released with 11g, it can be used with ASM 10g. by Placing the files into 10g home.
Download the AMDU Utility from ID 553639.1 as per your platform, and extract this will place a amdu binary and some lib files in the present working directory.
Set you LD_LIBRARY_PATH and the run AMDU utility.
$cd
$export LD_LIBRARY_PATH=$LD_LIBRARY_PATH:`pwd`
or $setenv LD_LIBRARY_PATH ${LD_LIBRARY_PATH}:`pwd`
$export PATH=$PATH:`pwd` or setenv PATH ${PATH}:`pwd`
or
$cd
$export LIBPATH=$LIBPATH:`pwd`
or $setenv LIBPATH ${LIBPATH}:`pwd`
$export PATH=$PATH:`pwd` or setenv PATH ${PATH}:`pwd`
Running the AMDU Script:-
amdu -diskstring '/dev/asm1_disk*' -dump 'DATA1'
Three files will be created:
* report.txt which provides details of disks identified during the amdu execution
$ more report.txt
-*-amdu-*-
******************************* AMDU Settings ********************************
ORACLE_HOME = /u01/app/11.2.0/grid
System name: Linux
Node name:
Release: 2.6.18-128.4.1.0.1.el5
Version: #1 SMP Tue Aug 4 15:10:25 EDT 2009
Machine: i686
amdu run:
Endianess: 1
...
----------------------------- DISK REPORT N0001 ------------------------------
Disk Path: ORCL:DISK1
Unique Disk ID:
Disk Label: DISK1
Physical Sector Size: 512 bytes
Disk Size: 4886 megabytes
Group Name: DATA
Disk Name: DISK1
Failure Group Name: DISK1
Disk Number: 0
Header Status: 3
Disk Creation Time: 2010/03/01 15:07:47.135000
Last Mount Time: 2011/09/02 15:35:52.676000
Compatibility Version: 0x0b200000(11020000)
Disk Sector Size: 512 bytes
Disk size in AUs: 4886 AUs
Group Redundancy: 1
Metadata Block Size: 4096 bytes
AU Size: 1048576 bytes
Stride: 113792 AUs
Group Creation Time: 2010/03/01 15:07:46.819000
File 1 Block 1 location: AU 2
OCR Present: NO
...
************************** SCANNING DISKGROUP DATA ***************************
Creation Time: 2010/03/01 15:07:46.819000
Disks Discovered: 2
Redundancy: 1
AU Size: 1048576 bytes
Metadata Block Size: 4096 bytes
Physical Sector Size: 512 bytes
Metadata Stride: 113792 AU
Duplicate Disk Numbers: 0
---------------------------- SCANNING DISK N0001 -----------------------------
Disk N0001: 'ORCL:DISK1'
Allocated AU's: 2563
Free AU's: 2323
AU's read for dump: 34
Block images saved: 6661
Map lines written: 34
Heartbeats seen: 0
Corrupt metadata blocks: 0
Corrupt AT blocks: 0
...
* .map, Map files are ASCII files that describe the data in the image files for a particular disk group
$ more DATA.map
N0001 D0000 R00 A00000000 F00000000 I0 E00000000 U00 C00256 S0000 B0000000000
N0001 D0000 R00 A00000001 F00000000 I0 E00000000 U00 C00256 S0000 B0000000000
N0001 D0000 R00 A00000002 F00000001 I0 E00000000 U00 C00256 S0000 B0000000000
N0001 D0000 R00 A00000003 F00000003 I0 E00000001 U00 C00256 S0000 B0000000000
N0001 D0000 R00 A00000004 F00000003 I0 E00000011 U00 C00256 S0000 B0000000000
...
N0001 D0000 R00 A00000234 F00000267 I1 E00000000 U00 C00001 S0000 B0000000000
*.img - For each diskgroup, could be many image files. The size is limited to 2gb and will be a exact dump of the content of the diskgroup.
When you use, the extract for the disk a .img copy will be created of multiple sizes of 2gb.
amdu -diskstring="ORCL:*" -extract DATA.267 -output NSA_TN_DATA.267 -noreport -nodir
You can use this .img file with Oracle Unloader to extract the data
So with the AMDU , you can very well know your disk group structures with out having them mounted, but its just that some internals you have to know, I Urge you do not try this on production systems without knowing what exactly this utility does.
-Thanks
Geek DBA
Hello,
We all aware that Oracle Automatic storage management offers striping of disks but propreitory of its own method.
To stripe data, Oracle ASM separates files into stripes and spreads data evenly across all of the disks in a disk group. It has two methods of striping, Fine & Coarse.
Fine Striping:- Fine striping writes 128 KB data to each ASM Disk in the diskgroup in a round robin fashion, 128 KB goes to the first disk, then the next 128 KB, goes to the next disk, etc. According to manual, The fine-grained stripe size always equals 128 KB in any configuration; this provides lower I/O latency for small I/O operations.” Small I/O operations sure sounds like a good candidate for redo logs, control files etc.
Coarse Striping:-With coarse grained striping ASM writes data to each disk in the same round robin fashion, but writes chunks in the size of the ASM instance’s allocation unit (AU) size, default is 1MB.
Further, starting from 11gR2, Online redo log files are no more in Fine striping contradictory to 10g, as Oracle silently changed the template to Coarse striping.
A note has been written on the same:- Redo Log Striping In 11.2 ASM, is Coarse Or Fine? [ID 1269158.1]
----------------------------------------------------------------------------------------------------------------
Mirroring
ASM mirroring has three types, External, Normal, High
External:- No mirroring from Automatic storagement
Normal:- Two Way mirroring, (Required two diskgroups)
High:- Three way mirroring, (Required three diskgroups)
Mirroring as you aware the copy of same extents to multiple disks
Further along with mirroring, Oracle Intelligently place the extents in two modes,
COLD, MIRRORCOLD - use the inner most tracks (closest to spindle) on the disk drive.
HOT, MIRRORHOT - Use the outermost tracks which have greater speed and higher bandwidth.
Please look at the diagrams explaining about Striping.


Please look at the diagrams explaining the mirroring
-Thanks
Geek DBA
Oracle 10gR2 provides an advanced load balancing method to overcome the imbalance of RAC logon’s , especially when there is logon storms, the listeners on the two nodes will simply distribute them evenly across both the nodes. Some case one of the node can be busier than the other . The LBA will calculate how much work each instance in the clustered database has been asked to do. The LBA will then make sure that any new incoming work is routed to the instance(s) that are least busy. This determination takes place on a service-by-service basis across all instances that are providing resources to each service.
The LBA considers the following factors when determining how to perform this “balancing act”:
- Are there any differences in processing power between nodes?
- Are there any sessions that are currently blocked from execution because of waits?
- Have any failures occurred on a node that might block processing from continuing?
- Are there any services that are competing for resources, and have those services been granted a different priority to complete their tasks at hand?
Not only does this help to balance out the total workload across all instances in the cluster, it also insures that one node won’t be overwhelmed by requests for service by its primary application(s).
As part of its Fast Application Notification (FAN) event transmission features, Oracle 10g RAC uses Oracle Notification Services (ONS) to communicate the status of cluster resources to all participating node applications in the cluster. In Oracle 10gR2, FAN added a new event type, SERVICE_METRIC, whose event payload contains
Continue reading Oracle RAC: Load Balancing advisory concepts
|
Follow Me!!!