In this post, we will see how to create a standalone MongoDB Instance.
Installation is pretty straight forward just download and modify few configuration options and start the instance. This is just to prepare and know ourself, whilst the next posts will be continuation of this post , to convert the single instance to a replica set in standalone server (for practice) and then converting to a shard, which all will be hosted on single host for practice purpose.
To do the installation the following steps are necessary,
- Complete some pre-requisities
- Create Mongo user
- Create Data Directories and Log Directories (specific to our setup)
- Download and Install the MongoDB Software
- Modify the Options
- Start the mongodb instance
- Diagram of the Instance
### Complete the pre-requisties ###
- /sys/kernel/mm/transparent_hugepage/defrag should be 'never'
- soft rlimits too low. rlimits set to 1024 processes, 64000 files. Number of processes should be at least 32000 : 0.5 times number of files
- Ports from 27017 to 65556 should be open (we use some range for all our nodes in future posts)
- 32Bit version can hold only 2gb of data, hence use 64bit operating system
### Create mongo User ###
useradd -g mongo mongo
passwd mongo
### Create Directories ###
mkdir -p /backups/data/cluster/shard1/rs0/0/logs
mkdir -p /backups/data/cluster/shard1/rs0/0/data
Note: /backups/data/cluster is my base directory and shard1 is to identify the shard and rs0 belongs to replicaset and 0 is node sequence, this is just to for directory nomenclature to host all in one standalone server for practice purpose.
### Download and Install MongoDB Software ###
### Create Repo File
vi /etc/yum.repos.d/mongodb.repo
[mongodb]
name=mongodb Repository
baseurl=http://downloads-distro.mongodb.org/repo/redhat/os/x86_64
gpgcheck=0
enabled=1
:wq
### Install Mongo using yum, this will install all pre-requisities RPM for MongoDB ###
yum install mongo-*
A typical output will be like this
Installed:
mongodb-enterprise.x86_64 0:3.2.1-1.el6 mongodb-enterprise-server.x86_64 0:3.2.1-1.el6 mongodb-enterprise-shell.x86_64 0:3.2.1-1.el6
mongodb-enterprise-tools.x86_64 0:3.2.1-1.el6
Dependency Installed:
cyrus-sasl-gssapi.x86_64 0:2.1.23-15.el6_6.2 cyrus-sasl-plain.x86_64 0:2.1.23-15.el6_6.2 net-snmp.x86_64 1:5.5-57.0.1.el6_8.1
Dependency Updated:
net-snmp-libs.x86_64 1:5.5-57.0.1.el6_8.1 net-snmp-utils.x86_64 1:5.5-57.0.1.el6_8.1
### Alternatively you can directly download using wget
### Configure the Conf file ###
vi /backups/data/cluster/shard1/rs0.conf
systemLog:
destination: file
path: "/backups/data/cluster/shard1/rs0/0/logs/rs0.log"
logAppend: true
processManagement:
pidFilePath: "/backups/data/cluster/shard1/rs0/0/shard1.pid"
fork: true
net:
bindIp: 127.0.0.1
port: 47018
storage:
engine: "mmapv1"
dbPath: "/backups/data/cluster/shard1/rs0/0/data"
directoryPerDB: true
operationProfiling:
mode: all
:wq
### Start the mongod instance ###
mongod -f /backups/data/cluster/shard1/rs0.conf
### Verify the process running ###
root@wash-i-03aaefdf-restore /backups/data/cluster/shard1/rs0/1/data/foo $ ps -eaf | grep mongo
root 21615 1 6 11:42 ? 00:02:28 mongod -f /backups/data/cluster/shard1/rs0.conf
### Stop the mongod Instance ###
mongod -f /backups/data/cluster/shard1/rs0.conf --shutdown
### login into the mongodb instance ###
mongo localhost:47018
### Creating a Sample Database & Collection ###
mongo localhost:47018
use foo
### Insert Records
for (var i = 1; i <= 500000; i++) db.testData.insert( { x : i } )
Output: WriteResult({ "nInserted" : 1 })
### Querying the Database ###
mongo localhost:47018
use foo
db.testData.find()
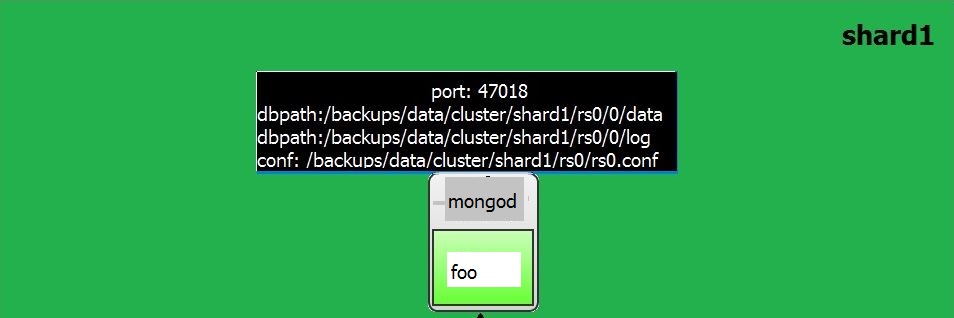
### The single instance looks like as this diagram ###
Next Post: Converting the Single MongoDB Instance to Replicaset in Standalone Server
Follow Me!!!